FastAPI
前言
![]()
FastAPI 是一个用于构建 API 的现代、快速(高性能)的 web 框架,使用 Python 3.6+ 并基于标准的 Python 类型提示。
它拥有的关键特性:
- 快速:可与 NodeJS 和 Go 比肩的极高性能(归功于 Starlette 和 Pydantic)。最快的 Python web 框架之一。
- 高效编码:提高功能开发速度约 200% 至 300%。*
- 更少 bug:减少约 40% 的人为(开发者)导致错误。*
- 智能:极佳的编辑器支持。处处皆可自动补全,减少调试时间。
- 简单:设计的易于使用和学习,阅读文档的时间更短。
- 简短:使代码重复最小化。通过不同的参数声明实现丰富功能。bug 更少。
- 健壮:生产可用级别的代码。还有自动生成的交互式文档。
- 标准化:基于(并完全兼容)API 的相关开放标准:OpenAPI (以前被称为 Swagger) 和 JSON Schema。
FastAPI相比于其余的Python Web框架来说,主要用于构建后端API方向,它拥有比其余的Python Web框架更好的性能。启动时间十分之快,极大提升了开发进度。并且自动拥有API文档界面,更方便的支持类型输入。
FastAPI是去年2021年Github上年度最佳新兴框架,目前在GitHub上拥有45.5K的Star,被多个国际大公司所认可,十分具有学习、使用价值。
入门
在学习使用FastAPI前,确保运行环境下安装Python3.6以上版本,因为FastAPI基于Python3.6+设计。
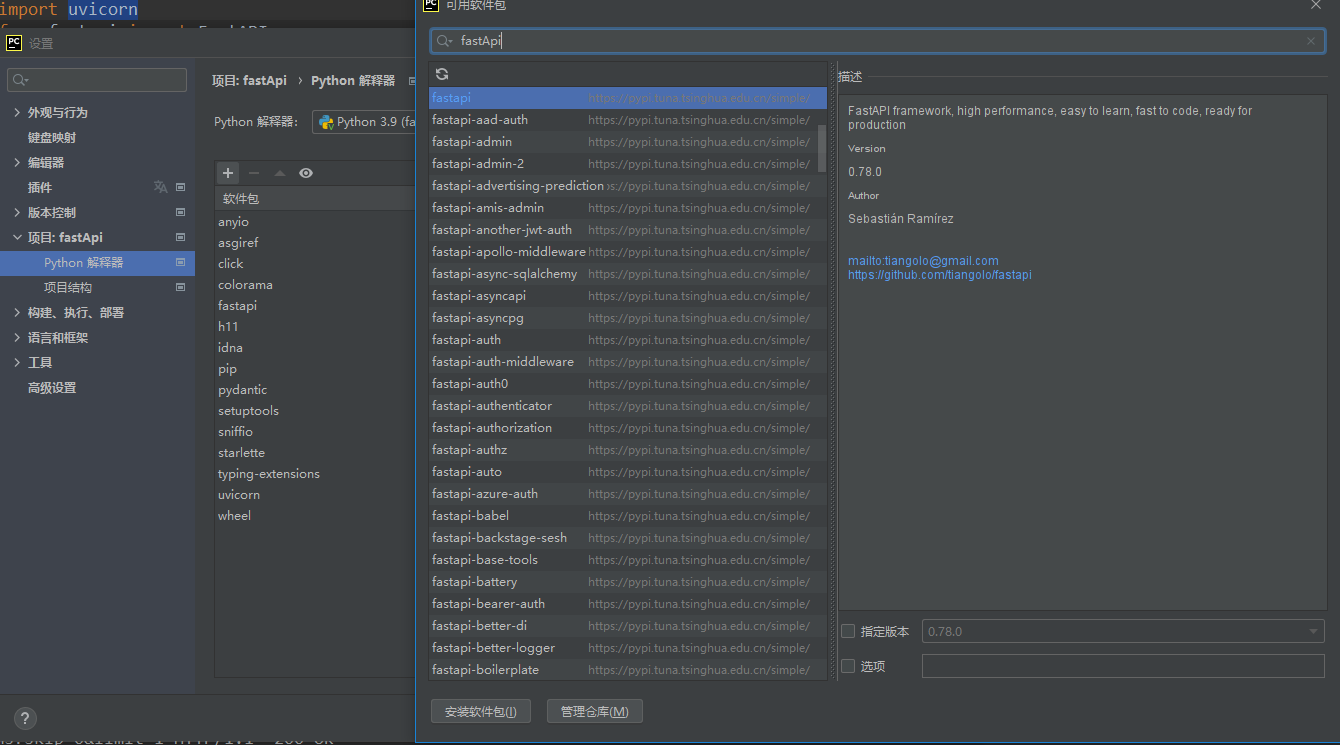
按正常流程是安装 FastAPI ,但是这里不建议直接在CMD中使用PIP安装。
这里 以项目形式,使用Pycharm IDE来进行学习。创建一个正常的Python项目,在项目中安装FastAPI、uvicorn,其中uvicorn是一个目前流行的异步服务器。
随后在项目 main.py文件中输入如下内容:
import uvicorn
from fastapi import FastAPI

app = FastAPI()

@app.get("/")
async def root():
    return {"message": "Hello World"}

if __name__ == "__main__":
    uvicorn.run(app, host="127.0.0.1", port=8000)
点击运行main。成功在127.0.0.1:8000下启动服务器:
INFO:     Started server process [34400]
INFO:     Waiting for application startup.
INFO:     Application startup complete.
INFO:     Uvicorn running on http://127.0.0.1:8000 (Press CTRL+C to quit)
上面内容就定义了一个首页的API输出,打开浏览器、后者使用第三方工具 访问http://127.0.0.1:8000页面。
会发现成功输出了{"message": "Hello World"}内容,这一切都使用了RestAPI形式。
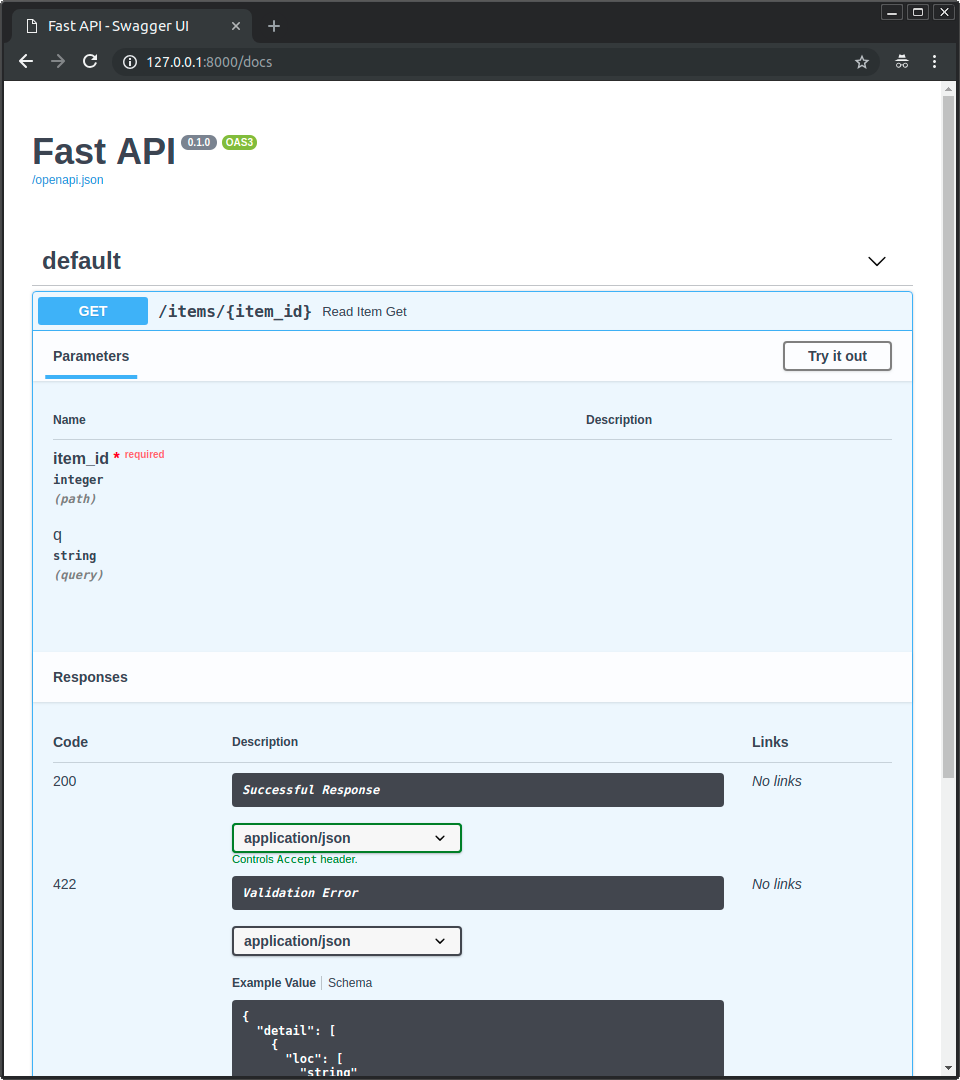
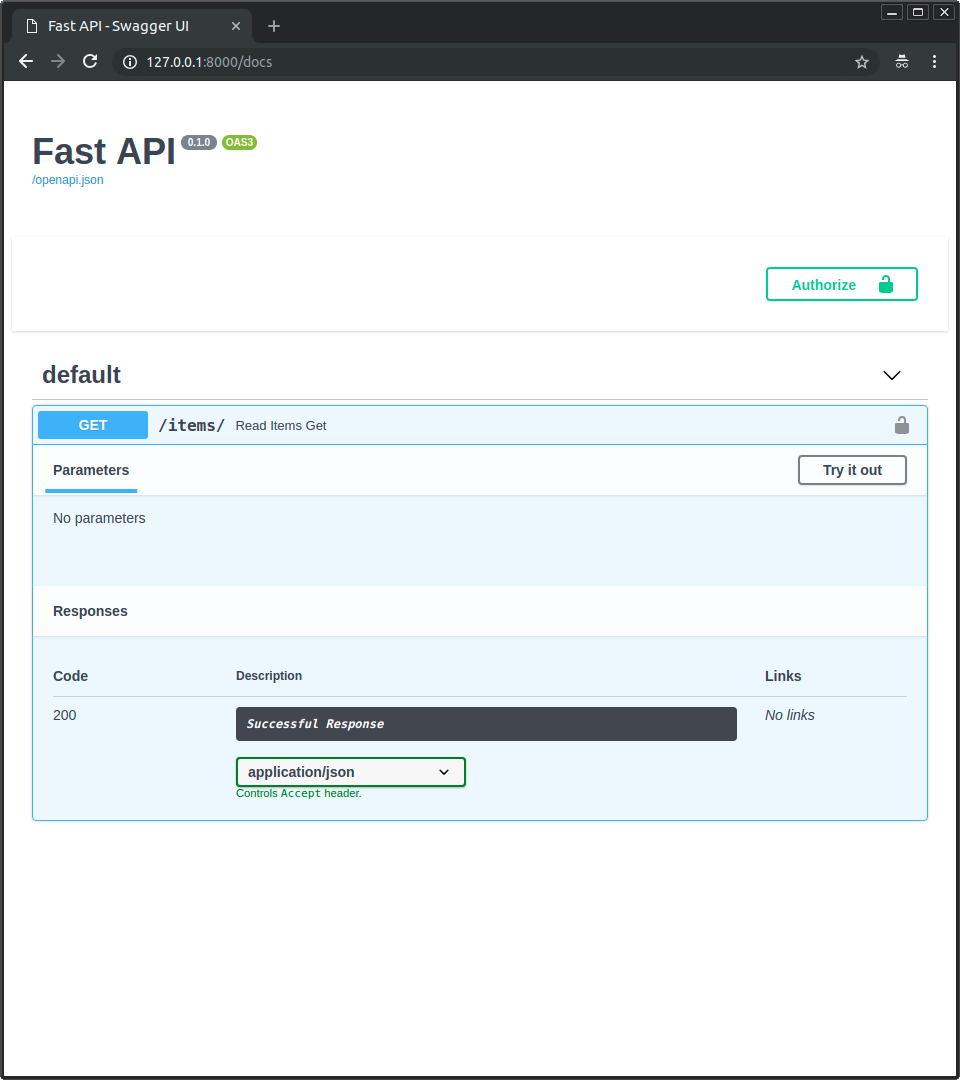
API文档页面
前面提到了FastAPI中自动生成了API文档页面,这一切都不需要配置。
在服务器启动状态下,访问http://127.0.0.1:8000/docs 页面,你将会看到自动生成的交互式 API 文档,它使用Swagger UI形式。
除了Swagger-UI文档之外,FastAPI还内置了ReDoc形式文档,进入http://127.0.0.1:8000/redoc 即可。
详细学习
启动服务器
从上面的入门中,我们就可以发现,要启动整个FastAPI服务器的话,分3大部分:
创建FastAPI的实例:
app = FastAPI()创建对应接口:这一部分就是我们需要关注项目的主要部分之一了。
在Python文件入口中,开启服务器:
if __name__ == "__main__":
    uvicorn.run(app, host="127.0.0.1", port=8000)
接口的书写
GET方法请求
FastAPI的接口写法和Java的Spring的Restful API写法十分相像。
@app.get("/")
async def root():
    return {"message": "Hello World"}

# 动态路径的请求
@app.get("/param/{item_id}")
async def get_param(item_id: int):
    return {"itemId": item_id,"message":"This is a param content"}

fake_items_db = [{"item_name": "Foo"}, {"item_name": "Bar"}, {"item_name": "Baz"}]

# 参数查询的请求
@app.get("/get")
async def get1(id: int = 10):
    return {"id": id, "data": fake_items_db[:3]}

# 可选参数的设置
# 其中Union为typing 包函数
@app.get("/get")
async def get2(id: int = 10,limit:Union[int, None] = None):
    if limit:
        return {"id": id, "data": fake_items_db[:limit]}
    return {"id": id, "data": fake_items_db[:3]}
上面为FastAPI中GET方法的一些使用方法。
其中@app.get()注解,表示其为GET方法的接口,它需要接受一个路径,用作API地址。相应的POST、DELETE、PUT都是同样类似方法。
API接口可以使用async异步,表示此接口为异步步骤,与不带异步关键字的 接口的使用区别:
当你使用到第三方库时,需要调用到它们
await时,就需要在接口函数def前使用async,才能实现异步并发效果。而当您正在使用与某些东西(数据库、API、文件系统等)通信并且不支持使用的第三方库
await(目前大多数数据库库都是这种情况),然后声明您的路径操作正常运行,只需def即可。而当你的项目中,不必与其它东西进行链接通讯时,使用
async def可以获得最佳性能。
FastAPI在输入参数可以对其参数类型进行 规定,并且可以设置默认值。当API 输入的参数类型不一致的话,FastAPI会抛出类型错误。
async def get1(id: int = 10):
    ...
默认情况下入参是必输内容。但利用Python3.5+类型的特性(参数类型支持2个),结合Union函数,在另一个参数类型中定义None,并且设置默认值为None,即可将其参数设置为可选参数。
async def get2(id: int = 10,limit:Union[int, None] = None):
    ...
除了查询参数的可选设置,还可以设置响应的检验:
from fastapi import FastAPI, Query

@app.get("/items/")
async def read_items(q: Union[str, None] = Query(default=None, max_length=50)):
    results = {"items": [{"item_id": "Foo"}, {"item_id": "Bar"}]}
    if q:
        results.update({"q": q})
    return results
这里的q: Union[str, None] = Query(default=None, max_length=50),表示这个参数时一个可选参数并且最大长度为50。除了Query中有 max_length外,还拥有最小值检验min_length。
也可以在正则表达式检验:
q: Union[str, None] = Query(
        default=None, regex="^fixedquery$"
)
上述Query中都带有default,表明这个是可选输入参数。对于必须参数的话,不要带有default:
q: str = Query(min_length=3)
除此之外,Query还支持下面这些内容定义:
- default:参数的默认值。
- title:参数的标题。用作在 OpenAPI 和自动 API 文档用户界面中作为 API 的标题/名称使用。
- description:参数的说明。用作在 OpenAPI 和自动 API 文档用户界面中对该参数的描述。
- gt:要求参数大于这个值,必须为数字。
POST方法请求
如上所描述,FastAPI的POST方法请求使用的@app.post()注解。同样PUT方法使用@app.put()注解。
@app.post("/items/")
async def create_item(name: str,description: Union[str, None] = None):
    ...
    return ...
请求模型
在项目中通常是将请求内容封装为请求模型,当做请求的模型。
要将其请求参数组装为模型的话,这个请求模型要继承pydantic 的 BaseModel。
from typing import Union

from fastapi import FastAPI
from pydantic import BaseModel

class Item(BaseModel):
    name: str
    description: Union[str, None] = None
    price: float
    tax: Union[float, None] = None

app = FastAPI()

@app.post("/items/")
async def create_item(item: Item):
    item_dict = item.dict()
    if item.tax:
        price_with_tax = item.price + item.tax
        item_dict.update({"price_with_tax": price_with_tax})
    return item_dict
在请求函数内部,还可以利用dict函数提取到对应dict,然后使用update可以向提交的请求体中添加内容。
注意:你不能使用 GET 操作(HTTP 方法)发送请求体。
要发送数据,你必须使用下列方法之一:POST(较常见)、PUT、DELETE 或 PATCH。
对于同时请求链接中拥有路径参数时,FastAPI 将识别出与路径参数匹配的函数参数应从路径中获取,而声明为 Pydantic 模型的函数参数应从请求体中获取。
class Item(BaseModel):
    name: str
    description: Union[str, None] = None
    price: float
    tax: Union[float, None] = None

app = FastAPI()

@app.put("/items/{item_id}")
async def create_item(item_id: int, item: Item):
    return {"item_id": item_id, **item.dict()}
我们除了定义请求模型之外,通常情况下还需要对每个参数在接口文档中进行说明,否则接口文档中的参数很难被其他人所明白。
声明效验
对请求模型的参数使用 Pydantic 的 Field 即可对参数进行声明校验和元数据等。
class Item(BaseModel):
    name: str
    description: Union[str, None] = Field(
        default=None, title="说明", max_length=300
    )
    price: float = Field(gt=0, description="这个金额必须大于0!")
    tax: Union[float, None] = None
使用Fileld就和前面提到的Query一样。
高级类型定义
在创建请求体时,除了使用常规的基本类型外,还可以使用List类型、Set类型:
class Item(BaseModel):
    tags1: List[str] = []
    tags2: Set[str] = set()
    tags3: Dict[int, float] = {}
不只是请求体,对于请求函数的单独入参也可以这样声明。
还可以接受另外一个模型,用来嵌套:
class Image(BaseModel):
    url: str
    name: str


class Item(BaseModel):
    name: str
    image: Union[Image, None] = None
声明示例
对于接口文档,我们可以对请求体的内容声明一个示例,用作在接口文档上示例。
只需要在请求体模型内定义一个Config类,在其schema_extra中定义“example”:
class Item(BaseModel):
    name: str
    description: Union[str, None] = None
    price: float
    tax: Union[float, None] = None

    class Config:
        schema_extra = {
            "example": {
                "name": "Foo",
                "description": "A very nice Item",
                "price": 35.4,
                "tax": 3.2,
            }
        }
GET查询的请求体参数拼装
前面提到了创建BaseModel作为请求体可以大幅减少请求重复使用的问题,以及规范化请求。但是也提到了只能使用到POST相关的请求接口上,GET相关请求无法使用。
对于GET请求的请求体创建使用,官方称之为使用依赖注入机制。它有2种实现方式:
第一种实现方法:依赖项就是一个函数,且可以使用与路径操作函数相同的参数,它返回对应的GET查询请求的内容:
async def common_parameters(
    q: Union[str, None] = None, skip: int = 0, limit: int = 100
):
    return {"q": q, "skip": skip, "limit": limit}


@app.get("/items/")
async def read_items(commons: dict = Depends(common_parameters)):
    return commons
这里创建了一个
common_parameters函数当做依赖项。在请求接口的输入参数中输入dict,使用Depends函数。这样这个请求接口输入参数就会有 依赖项返回的内容了。
第二种实现方法:创建一个请求类,继承BaseModel,内部参数遵循查询参数写法:
class Student(BaseModel):
    name: str
    age: Union[int, None] = None


@app.get("/")
def read_root(student: Student = Depends()):
    return {"name": student.name, "age": student.age}是
直接在GET请求入参下输入对应请求类,默认值上使用
Depends()。这样既可将其请求类以查询参数方式进行工作。
PUT更新
更新数据请用 HTTP PUT 操作。
把输入数据转换为以 JSON 格式存储的数据(比如,使用 NoSQL 数据库时),可以使用 jsonable_encoder。例如,把 datetime 转换为 str。
@app.put("/items/{item_id}", response_model=Item)
async def update_item(item_id: str, item: Item):
    update_item_encoded = jsonable_encoder(item)
    items[item_id] = update_item_encoded
    return update_item_encoded
数据类型
FastAPI利用Pydantic来实现类型检验。它支持多种数据类型,其中数据有一些常用的数据类型:
- int
- float
- str
- bool
除此之外,还有众多其他数据类型:
- UUID:一种标准的 “通用唯一标识符” ,在许多数据库和系统中用作ID。在请求和响应中将以
str表示。 - datetime.datetime:在请求和响应中将表示为 ISO 8601 时间格式的
str,比如:2008-09-15T15:53:00+05:00。- datetime.date:在请求和响应中将表示为 ISO 8601 格式的
str,比如:2008-09-15。
- datetime.date:在请求和响应中将表示为 ISO 8601 格式的
- Decimal:在请求和相应中被当做
float一样处理。
更多额外的内置数据类型,可查询Pydantic文档https://pydantic-docs.helpmanual.io/usage/types/
请求头部
要实现对FastAPI接口的请求头部进行发送相关内容的话,需要导入fastapi包下的Header函数。
在接口参数下,定义需要对头部定义参数即可,如下:
from typing import Union
from fastapi import FastAPI, Header

@app.get("/header/")
async def read_items(admin_token: Union[str, None] = Header(default=None)):
    return {"admin-token": admin_token}
注意:大多数标准的headers用 “连字符” 分隔,也称为 “减号” (-)。
但是像 user-agent 这样的变量在Python中是无效的。
因此, 默认情况下, Header 将把参数名称的字符从下划线 (_) 转换为连字符 (-) 来提取并记录 headers。
同时,HTTP headers 是大小写不敏感的,因此,因此可以使用标准Python样式(也称为 “snake_case”)声明它们。因此,您可以像通常在Python代码中那样使用 user_agent ,而不需要将首字母大写为 User_Agent 或类似的东西。
响应模型
前面我们创建了请求模型,它是用作封装请求接口的。
而对于有些响应返回的类型我们在项目中通常也会将其封装,称为响应模型。
它的创建方法和请求模型一样,都是继承与BaseModel类。
class ResultItem(BaseModel):
    name: str
    description: Union[str, None] = None
    price: float
    tax: float = 10.5
当它直接被用作返回时,也不会被有检验效果。需要在对应请求接口注解上的response_model进行配置:
@app.post("/items/", response_model=Item)
async def create_item(xxx:xxx):
    ...
    # item是一个Item类的实例对象
    return item
有时,为了简便,通常用一个BaseModel既做 请求模型 又做 响应模型。但出现一个隐私问题,比如某个BaseModel中存在一些隐私数据的话,像用户注册时输入的密码,直接返回整个相同的BaseModel是十分不安全的。
对于隐私数据,可以在接口请求注解上使用response_model_exclude来排除某个指定的参数:
class Item(BaseModel):
    name: str
    description: Union[str, None] = None
    price: float
    tax: float = 10.5


items = {
    "foo": {"name": "Foo", "price": 50.2},
    "bar": {"name": "Bar", "description": "The Bar fighters", "price": 62, "tax": 20.2},
    "baz": {
        "name": "Baz",
        "description": "There goes my baz",
        "price": 50.2,
        "tax": 10.5,
    },
}

@app.get("/items/{item_id}/public", response_model=Item, response_model_exclude={"tax"})
async def read_item_public_data(item_id: str):
    return items[item_id]
返回的响应数据不一定需要相同类,FastAPI的响应模型只是输出内部对应的数据:
class UserIn(BaseModel):
    username: str
    password: str
    full_name: Union[str, None] = None


class UserOut(BaseModel):
    username: str
    full_name: Union[str, None] = None


@app.post("/user/", response_model=UserOut)
async def create_user(user_in: UserIn):
    return user_in
上述返回的类型在函数内部是一个 UserIn对象结构,但是返回结果为 UserOut对象结构。
表单数据请求
在有时接口接收的不是Json数据,而是Form表单数据,或者上传文件的接口,这时需要用到Form配置。
要使用表单配置,需预先安装 python-multipart。
from fastapi import FastAPI, Form

@app.post("/login/")
async def login(username: str = Form(), password: str = Form()):
    return {"username": username}
创建表单(Form)参数的方式与 Body 和 Query 一样。
例如,OAuth2 规范的 “密码流” 模式规定要通过表单字段发送 username 和 password。该规范要求字段必须命名为 username 和 password,并通过表单字段发送,不能用 JSON。使用 Form 可以声明与 Body (及 Query、Path、Cookie)相同的元数据和验证。
可在一个路径操作中声明多个 Form 参数,但不能同时声明要接收 JSON 的 Body 字段。因为此时请求体的编码是 application/x-www-form-urlencoded,不是 application/json。
表单数据的「媒体类型」编码一般为
application/x-www-form-urlencoded。但包含文件的表单编码为
multipart/form-data。
上传文件请求
要实现上传文件的请求,和表单数据请求一样,需要需预先安装 python-multipart。
从 fastapi 导入 File 和 UploadFile:
from fastapi import FastAPI, File, UploadFile

app = FastAPI()


@app.post("/files/")
async def create_file(file: bytes = File()):
    return {"file_size": len(file)}


@app.post("/uploadfile/")
async def create_upload_file(file: UploadFile):
    return {"filename": file.filename}
声明文件体必须使用 File,否则,FastAPI 会把该参数当作查询参数或请求体(JSON)参数。
其中 File()文件作为「表单数据」上传。如果把路径操作函数参数的类型声明为 bytes,FastAPI 将以 bytes 形式读取和接收文件内容。这种方式把文件的所有内容都存储在内存里,适用于小型文件。
而 UploadFile则是使用spooled 文件,它在存储到内存的文件超出最大上限时,FastAPI 会把文件存入磁盘,所以UploadFile 能上传更大文件,并且它可获取上传文件的元数据。
大多数情况下,UploadFile 更好使用。
UploadFile 的属性有如下:
filename:上传文件名字符串(str),例如,myimage.jpg;content_type:内容类型(MIME 类型 / 媒体类型)字符串(str),例如,image/jpeg;file:SpooledTemporaryFile( file-like 对象)。其实就是 Python文件,可直接传递给其他预期file-like对象的函数或支持库。
UploadFile 支持以下 async 方法,(使用内部 SpooledTemporaryFile)可调用相应的文件方法:
write(data):把data(str或bytes)写入文件;read(size):按指定数量的字节或字符(size(int))读取文件内容;seek(offset):移动至文件offset(int)字节处的位置;- 例如,
await myfile.seek(0)移动到文件开头; - 执行
await myfile.read()后,需再次读取已读取内容时,这种方法特别好用;
- 例如,
close():关闭文件。
上述方法都是 async 方法,要搭配「await」使用。
例如,在 async 路径操作函数 内,要用以下方式读取文件内容:
contents = await myfile.read()
在普通 def 路径操作函数 内,则可以直接访问 UploadFile.file,例如:
contents = myfile.file.read()
多文件上传
FastAPI 支持同时上传多个文件。
对于多文件上传,将其封装到List内即可:
@app.post("/files/")
async def create_files(files: List[bytes] = File()):
    return {"file_sizes": [len(file) for file in files]}


@app.post("/uploadfiles/")
async def create_upload_files(files: List[UploadFile]):
    return {"filenames": [file.filename for file in files]}
抛出错误
抛出普通浏览器错误
当接口出现输入情况下,往往会出现响应的错误状态,如404Not Find等等。
我们可以手动抛出对应的错误状态,只需要使用导入fastapi下的 HTTPException:
from fastapi import FastAPI, HTTPException

app = FastAPI()

items = {"foo": "The Foo Wrestlers"}


@app.get("/items/{item_id}")
async def read_item(item_id: str):
    if item_id not in items:
        raise HTTPException(status_code=404, detail="Item not found")
    return {"item": items[item_id]}
其中status_code下可以设置响应的浏览器错误码,detail则是错误时返回的Json内容,它接受的是任何可以被Json格式化的数据类型,不只是str。
抛出自定义错误
大多数情况下,在项目中都是抛出自定义的错误,而不是浏览器错误。
对此需要先定义一个自定义错误模型:
class UnicornException(Exception):
    def __init__(self, name: str):
        self.name = name
fastApi需要定义一个全局错误拦截器,捕捉到这个定义的自定义错误,并进行相应处理:
from fastapi.responses import JSONResponse

@app.exception_handler(UnicornException)
async def unicorn_exception_handler(request: Request, exc: UnicornException):
    return JSONResponse(
        status_code=418,
        content={"message": f"Oops! {exc.name} did something. There goes a rainbow..."},
    )
上述捕捉到自定义错误后返回了一个指定格式的JSON,并设置了状态码为418。其中上述的Request、JSONResponse都是可以使用starlette包下的内容,它会fastapi中的内容一样。
最后当接口函数中抛出这个自定义异常即可触发相应处理:
@app.get("/unicorns/{name}")
async def read_unicorn(name: str):
    if name == "yolo":
        raise UnicornException(name=name)
    return {"unicorn_name": name}
路径操作配置
在接口请求注解上,除了定义必须的 请求路径外,还可以配置各种信息,作用于接口。
返回状态
status_code 用于定义路径操作响应中的 HTTP 状态码。可以直接传递 int 代码, 比如 404。也可以使用status 的快捷常量:
from fastapi import status

@app.post("/items/", response_model=Item, status_code=status.HTTP_201_CREATED)
状态码在响应中返回,并会被添加到 OpenAPI 概图。
FastAPI 的fastapi.status 和 starlette.status 一样,只是快捷方式。
接口分类
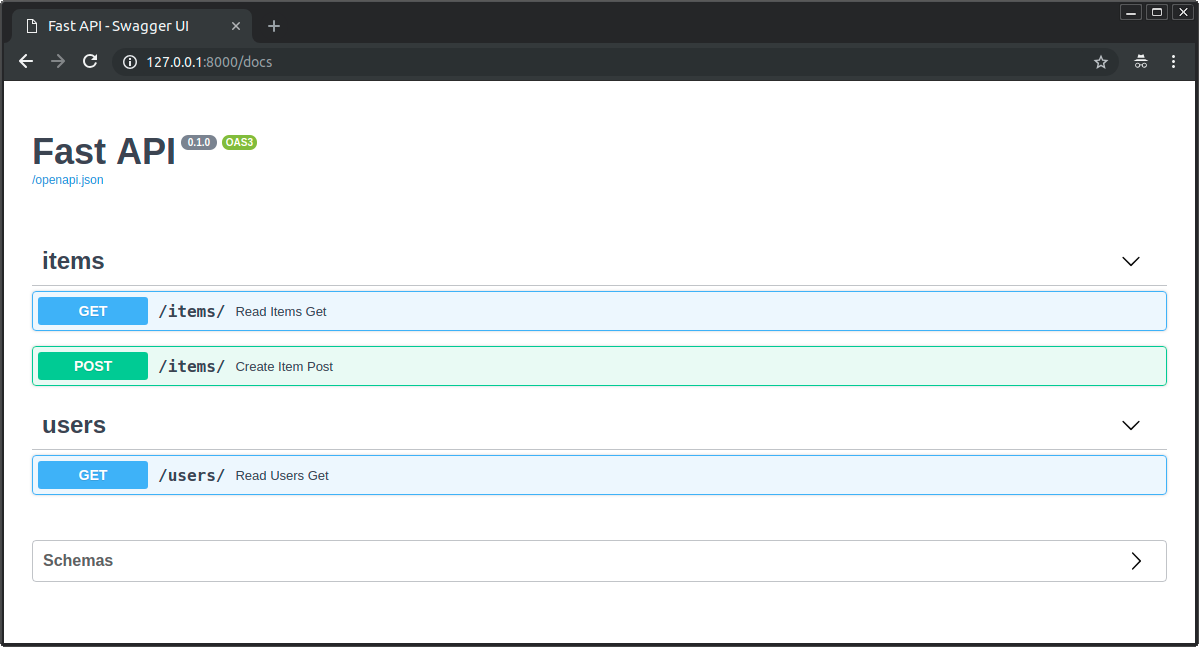
在接口设置tags 参数,对接口进行分类,规范化接口文档。
tags 参数的值是由 str 组成的 list (一般只有一个 str )。
@app.post("/items/", response_model=Item, tags=["items"])
接口说明
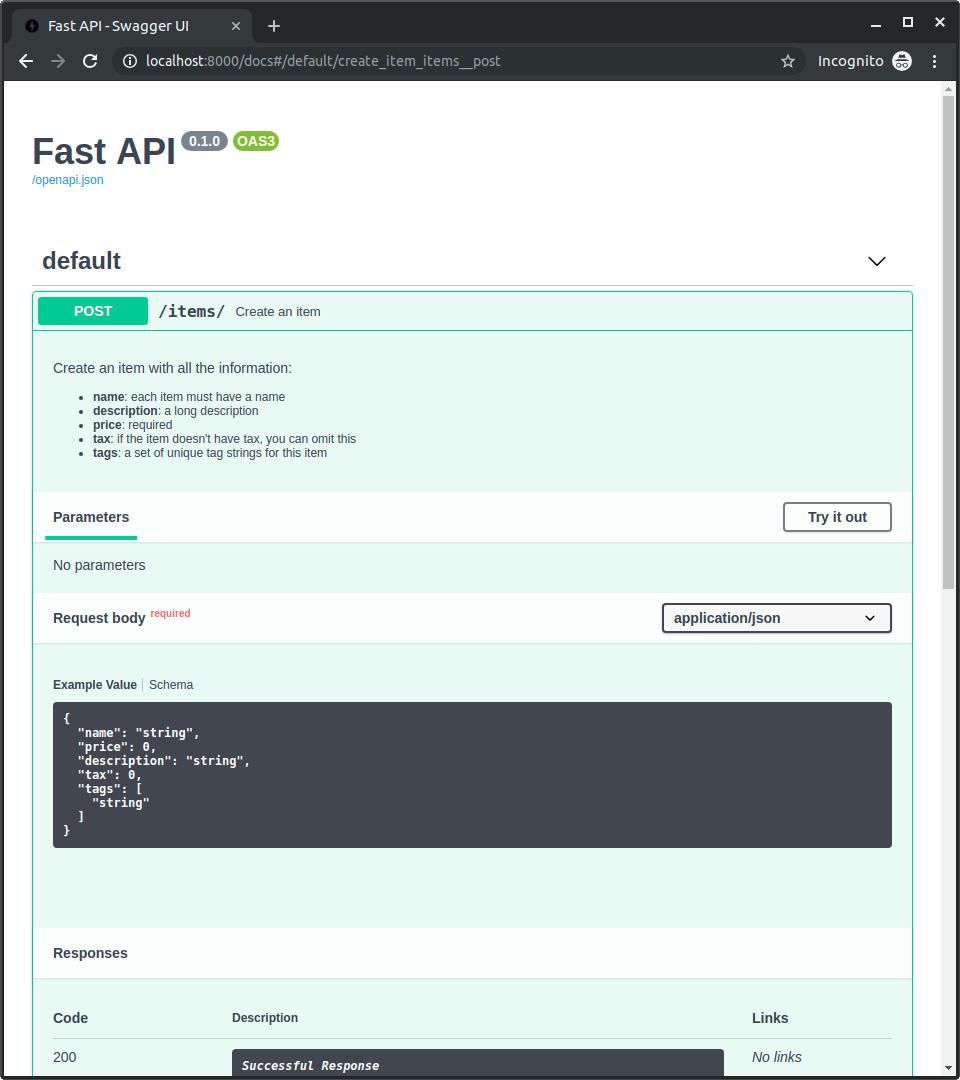
使用summary、description可以对接口进行声明。
@app.post(
    "/items/",
    response_model=Item,
    summary="Create an item",
    description="Create an item with all the information, name, description, price, tax and a set of unique tags",
)
summary: 接口标题 、description:接口说明
当其中description说明描述非常长的时候,可以考虑使用docstring,它支持多段文字,以及支持 Markdown,能正确解析和显示 Markdown 的内容,但要注意文档字符串的缩进。它的用法就是在函数内容开头以三个引号开始“”“,三个引号结束,中间进行描述。
@app.post("/items/", response_model=Item, summary="Create an item")
async def create_item(item: Item):
    """
    Create an item with all the information:

    - **name**: each item must have a name
    - **description**: a long description
    - **price**: required
    - **tax**: if the item doesn't have tax, you can omit this
    - **tags**: a set of unique tag strings for this item
    """
    return item
Json转换
在某些情况下,您可能需要将数据类型(如 Pydantic 模型)转换为与 JSON 兼容的类型(如dict、list等)。
FastApi内置了一个JSON转换器 - jsonable_encoder(),使用它可以将其自己的数据类型转换为与JSON兼容的数据类型。它的作用是将其数据内部的不可转换的数据类型(比如datetime)转换为Str格式。
from fastapi.encoders import jsonable_encoder

@app.put("/items/{id}")
def update_item(id: str, item: Item):
    json_compatible_item_data = jsonable_encoder(item)
    fake_db[id] = json_compatible_item_data
它不会直接转换为JSON的字符串,而是转换为list、dict这种兼容JSON的数据类型。
自定义响应
对于RestFul的接口,往往会返回一个Result JSON作为请求的响应。
Result的格式一般为请求状态码、响应信息、返回数据这三个内容。
对于FastAPI来说需要定义自定义响应模型,通常在Pydantic模型下文件夹创建一个resp.py用作存储自定义响应模型:
"""

统一响应状态码

"""
from typing import Union

from fastapi import status as http_status
from fastapi.responses import JSONResponse, Response
from fastapi.encoders import jsonable_encoder

class Resp(object):
    def __init__(self, status: int, msg: str, code: int):
        self.status = status
        self.msg = msg
        self.code = code

    def set_msg(self, msg):
        self.msg = msg
        return self


InvalidRequest: Resp = Resp(1000, "无效的请求", http_status.HTTP_400_BAD_REQUEST)
InvalidParams: Resp = Resp(1002, "无效的参数", http_status.HTTP_400_BAD_REQUEST)
BusinessError: Resp = Resp(1003, "业务错误", http_status.HTTP_400_BAD_REQUEST)
DataNotFound: Resp = Resp(1004, "查询失败", http_status.HTTP_400_BAD_REQUEST)
DataStoreFail: Resp = Resp(1005, "新增失败", http_status.HTTP_400_BAD_REQUEST)
DataUpdateFail: Resp = Resp(1006, "更新失败", http_status.HTTP_400_BAD_REQUEST)
DataDestroyFail: Resp = Resp(1007, "删除失败", http_status.HTTP_400_BAD_REQUEST)
PermissionDenied: Resp = Resp(1008, "权限拒绝", http_status.HTTP_403_FORBIDDEN)
ServerError: Resp = Resp(5000, "服务器繁忙", http_status.HTTP_500_INTERNAL_SERVER_ERROR)

def ok(*, data: Union[list, dict, str] = None, pagination: dict = None,  msg: str = "success") -> Response:
    return JSONResponse(
        status_code=http_status.HTTP_200_OK,
        content=jsonable_encoder({
            'status': 200,
            'msg': msg,
            'data': data,
            'pagination': pagination
        })
    )

def fail(resp: Resp) -> Response:
    return JSONResponse(
        status_code=resp.code,
        content=jsonable_encoder({
            'status': resp.status,
            'msg': resp.msg,
        })
    )
这里的返回类型为Response,Response 类接受如下参数:
content- 一个str或者bytes。status_code- 一个int类型的 HTTP 状态码。headers- 一个由字符串组成的dict。media_type- 一个给出媒体类型的str,比如"text/html"。
这里由JSONResponse函数生成相应的返回值。
所以这里的响应体中的 status_code是指的浏览器响应状态码,而content内的status是请求状态码。
在请求接口中 返回使用即可:
@app.get("/users/",summary="查询所有用户")
def read_users(skip: int = 0, limit: int = 100, db: Session = Depends(get_db)):
    users = user_dao.get_all_users(db, skip=skip, limit=limit)
    userList = []
    for useronde in users:
        usersd = user.User.from_orm(useronde)
        userList.append(usersd)
    return resp.ok(data=userList)
安全认证
FastAPI 提供了多种工具,可帮助你以标准的方式轻松、快速地处理安全性,而无需研究和学习所有的安全规范。
FastAPI 在 fastapi.security 模块中为每个安全方案提供了几种工具,这些工具简化了这些安全机制的使用方法。
为此我们学习使用OAuth2方式进行安全认证:
实现要实现启动OAuth2认证前,让我们来看一些小的概念:
OAuth2
OAuth2是一个规范,它定义了几种处理身份认证和授权的方法。
它是一个相当广泛的规范,涵盖了一些复杂的使用场景。
它包括了使用「第三方」进行身份认证的方法。
这就是所有带有「使用 Facebook,Google,Twitter,GitHub 登录」的系统背后所使用的机制。
实现OAuth2
使用“表单数据”来发送usernameand password,OAuth2来判断用户输入的账户和密码是否正确。如果正确就返回Token给请求方,请求方再用这个Token给其它需要认证的接口来进行操作。
由于这里涉及使用到表单数据,所以就项目中需要安装python-multipart.
在fastapi.security包中导入OAuth2PasswordBearer:
from fastapi import Depends, FastAPI
from fastapi.security import OAuth2PasswordBearer

app = FastAPI()

oauth2_scheme = OAuth2PasswordBearer(tokenUrl="token")


@app.get("/items/")
async def read_items(token: str = Depends(oauth2_scheme)):
    return {"token": token}
这里的tokenUrl 则是定义其认证头部名,这里定义为token。
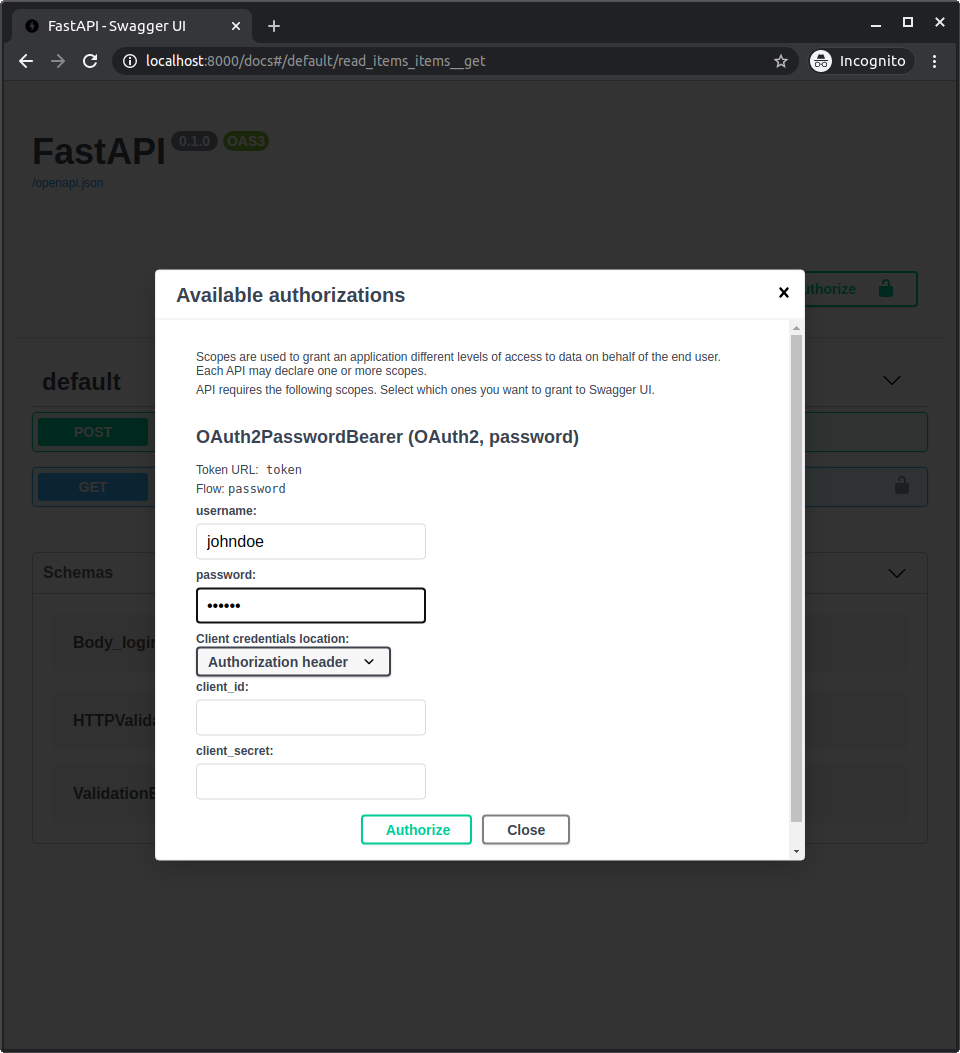
这样项目就完成了初步安全加密了,运行后发现:
您的路径操作上右上角多了一个小锁,您可以单击它,它有一个小授权表格来输入一个username和password(和其他可选字段),表示用来授权登录操作。
当然这里由于只设置了 认证要求,但没设置认证方法,所以这里并不能完成认证。
设置认证方法
上面只是展示了开启OAuth2认证的步骤,但是并没有编写认证方法。这里来进行编写认证方法:
所谓认证方法,就是用户认证登录的操作,在FastAPI的OAuth2认证中,默认以/token作为其认证方法路径,也就是说当用户登录时上传的路径其实是这个路径。
OAuth2的认证方法入参参数类型为OAuth2PasswordRequestForm,所以首先,导入 OAuth2PasswordRequestForm,然后在 token 的路径操作中通过 Depends 将其作为依赖项使用。
from fastapi.security import OAuth2PasswordBearer, OAuth2PasswordRequestForm

@app.post("/token")
async def login(form_data: OAuth2PasswordRequestForm = Depends()):
    ...
OAuth2PasswordRequestForm 是一个类依赖项,声明了如下的请求表单:
username。password。- 一个可选的
scope字段,是一个由空格分隔的字符串组成的大字符串。 - 一个可选的
grant_type. - 一个可选的
client_id - 一个可选的
client_secret
一般情况下,用户只需要传入username和password即可。
认证方法中内容则是 对于用户输入的信息进行认证。一般步骤有:
- 根据用户输入的
username在数据库中寻找是否存在,如果存在则继续,如果不存在就返回输入错误给用户。 - 根据用户输入的
password来与 数据库查询到的用户进行对比,如果相同则登录成功,返回用户信息。如果不相同,则返回输入错误给用户。
当然这个步骤在实际生产环境下禁止使用,因为里面的信息并不是加密信息,实际环境下数据库中不可能用明文存储密码的。当然这是下部分考虑的,目前先看下简单的操作。
这里我们用dict来创建一个”假的数据库”:
fake_users_db = {
    "johndoe": {
        "username": "johndoe",
        "full_name": "John Doe",
        "email": "johndoe@example.com",
        "hashed_password": "fakehashedsecret",
        "disabled": False,
    },
    "alice": {
        "username": "alice",
        "full_name": "Alice Wonderson",
        "email": "alice@example.com",
        "hashed_password": "fakehashedsecret2",
        "disabled": True,
    },
}
这里的拥有两个用户,其中hashed_password字段存储的是经过加密的密码(当然这里只是在密码前加了fakehashed,实际上不可能这样)。
随后我们创建一个用户模型:
class User(BaseModel):
    username: str
    email: Union[str, None] = None
    full_name: Union[str, None] = None
    disabled: Union[bool, None] = None

class UserInDB(User):
    hashed_password: str
这个User模型这里主要是用来登录成功返回用户信息的,它跟数据库中的字段是有差别的,没有敏感信息(比如密码),因为我们在登录成功后返回用户信息中,不能直接将密码返回给Response中,这是不安全的。
而UserInDB则是在此阶段多个敏感字段(这里指密码)。
创建完模型后,就可以在认证方法中编写从数据库中获取用户的信息步骤:
@app.post("/token")
async def login(form_data: OAuth2PasswordRequestForm = Depends()):
    user_dict = fake_users_db.get(form_data.username)
    if not user_dict:
        raise HTTPException(status_code=400, detail="Incorrect username or password")
    user = UserInDB(**user_dict)
    ...
这儿UserInDB(**user_dict)将其获取到的user_dict用户信息内容设置到了UserInDB对象中。
编写加密方式函数,用作对用户输入的密码进行加密操作:
def fake_hash_password(password: str):
    return "fakehashed" + password
在认证方法中将其用户输入的密码与数据库中的密码进行对比,最后返回指定信息即完成认证方法的编写。
@app.post("/token")
async def login(form_data: OAuth2PasswordRequestForm = Depends()):
    user_dict = fake_users_db.get(form_data.username)
    if not user_dict:
        raise HTTPException(status_code=400, detail="Incorrect username or password")
    user = UserInDB(**user_dict)
    hashed_password = fake_hash_password(form_data.password)
    if not hashed_password == user.hashed_password:
        raise HTTPException(status_code=400, detail="Incorrect username or password")

    return {"access_token": user.username, "token_type": "bearer"}
这里返回的响应必须是一个 JSON 对象。它应该有一个 token_type。在我们的例子中,由于我们使用的是「Bearer」令牌,因此令牌类型应为「bearer」。并且还应该有一个 access_token 字段,它是一个包含我们的访问令牌的字符串。这时FastAPI中的OAuth2的定义规范。
当然对于这个简单的示例,我们将极其不安全地返回相同的 username 作为令牌。
设置认证判断
上面我们编写了认证方法,用户在认证中成功认证后,将返回用户的名称作为 认证口令。
但是这只是认证方法,对于需要认证的 接口而言 并不起作用,因为它们不知道怎么判断是否认证。所以我们还需要编写认证判断的代码。
假设,我们编写了一个read_users_me 接口,它需要根据当前认证的用户返回认证用户的信息,如果没有认证,则报错:
@app.get("/users/me")
async def read_users_me(...):
    return current_user
对于这个我们需要编写一个获取当前用户的函数作为依赖项:
async def get_current_user(token: str = Depends(oauth2_scheme)):
    user = fake_decode_token(token)
    if not user:
        raise HTTPException(
            status_code=status.HTTP_401_UNAUTHORIZED,
            detail="Invalid authentication credentials",
            headers={"WWW-Authenticate": "Bearer"},
        )
    return user
它接收一个Token字符串(这里指定了oauth2_scheme依赖项,表明是从头部定义的内容获取),其中fake_decode_token函数为从数据库中获取定义用户信息:
def get_user(db, username: str):
    if username in db:
        user_dict = db[username]
        return UserInDB(**user_dict)


def fake_decode_token(token):
    # This doesn't provide any security at all
    # Check the next version
    user = get_user(fake_users_db, token)
    return user
实际上和认证方法中的 第一步 是一样的效果。
我们在需要认证的接口上的参数中注入get_current_user这个依赖项即可完成认证判断:
@app.get("/users/me")
async def read_users_me(current_user: User = Depends(get_current_active_user)):
    return current_user
运行项目,点击「Authorize」按钮。在username中输入johndoe,password中输入secret,点击Authorize登录。
在系统中进行身份认证后,你将看到:
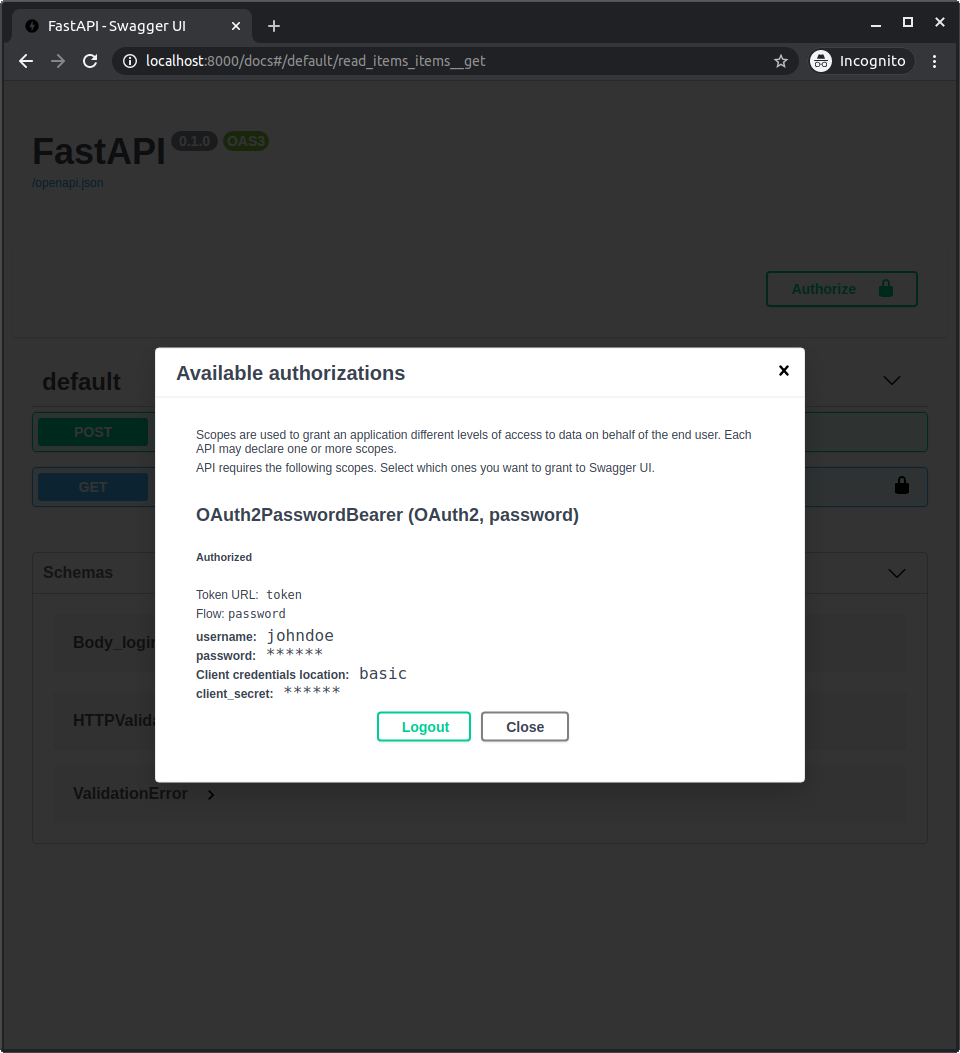
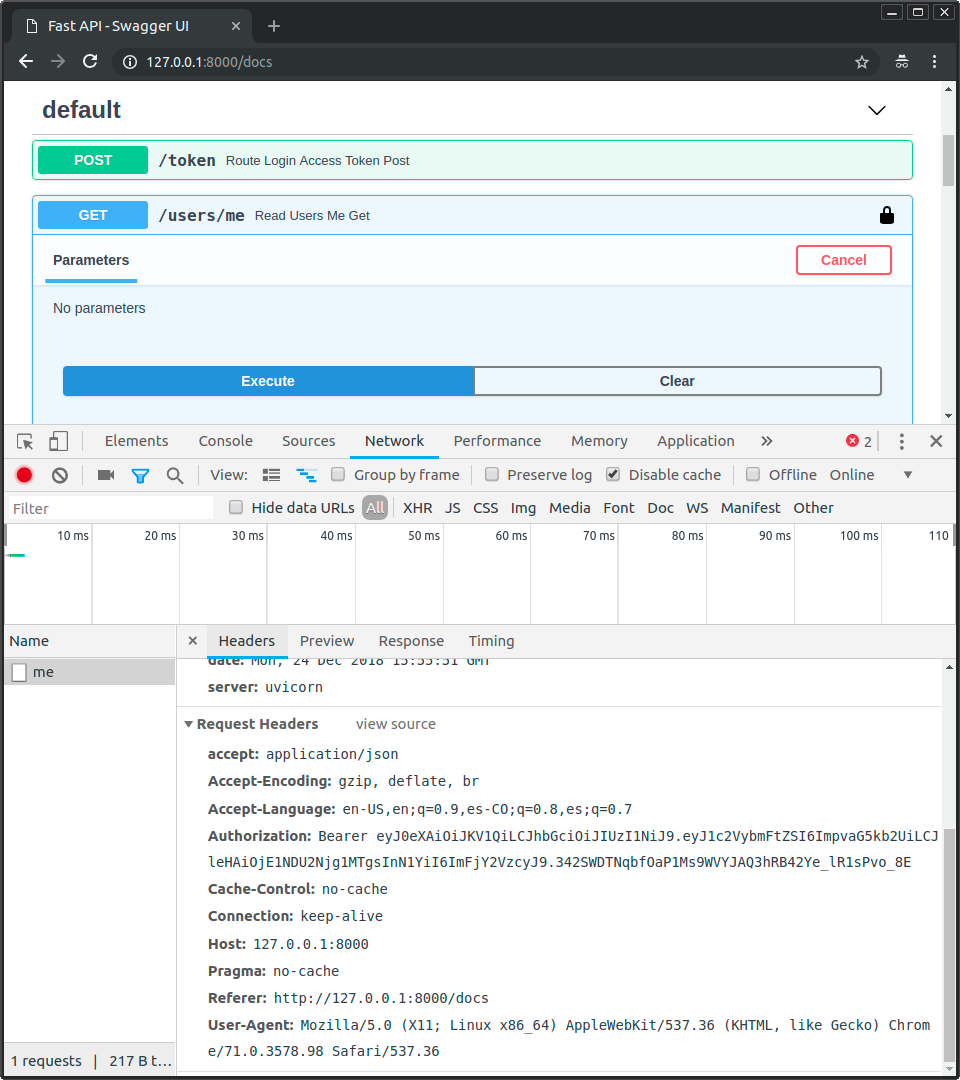
执行 /users/me 路径的 GET 操作,这时就会返回当前登入的用户信息了。
其实在执行 /users/me 路径操作时,OpenAPI文档就已经变相将其口令传入到头部中了,实际前后分离中 前端操作中需要手动在头部中传入登录返回的的口令,才能判断认证。比如这里在OAuth2PasswordBearer中设置的是 token,所以请求头部 就应该有一个“token”头部内容。
实现JWT以及Hash加密认证
前面的案例中只是普通固定字符串加密,在实际生成环境中需要对密码信息等用到Hash加密,否则无法保证安全性。
Hash加密
对于Python 实现Hash加密,推荐使用PassLib ,它支持多种Hash加密算法,这里推荐的算法是 「Bcrypt」,所以还需要安装Bcrypt。
$ pip install passlib
$ pip install bcrypt
通过使用passlib.context包的CryptContext 函数,我们可以实现加密、解密。
from passlib.context import CryptContext
...
# passlib使用bcrypt算法
pwd_context = CryptContext(schemes=["bcrypt"], deprecated="auto")

# 判断密码正确性
# pwd_context.verify接受 一个 未加密密码、一个加密密码,若加密相同则返回真
def verify_password(plain_password, hashed_password):
    return pwd_context.verify(plain_password, hashed_password)

# 加密密码
def get_password_hash(password):
    return pwd_context.hash(password)
我们只需要在其前面例子中的认证方法中的进行修改即可实现加密密码认证。
fake_users_db = {
    "johndoe": {
        "username": "johndoe",
        "full_name": "John Doe",
        "email": "johndoe@example.com",
        "hashed_password": "$2b$12$EixZaYVK1fsbw1ZfbX3OXePaWxn96p36WQoeG6Lruj3vjPGga31lW",
        "disabled": False,
    }
}

...
# 融合数据库获取用户信息 和 密码比对两个操作步骤
def authenticate_user(fake_db, username: str, password: str):
    user = get_user(fake_db, username)
    if not user:
        return False
    if not verify_password(password, user.hashed_password):
        return False
    return user

@app.post("/token", response_model=Token)
async def login_for_access_token(form_data: OAuth2PasswordRequestForm = Depends()):
    user = authenticate_user(fake_users_db, form_data.username, form_data.password)
    ...
除了对密码进行Hash加密之外,在安全上 还需要使用JWT口令作为token的传值。
关于 JWT
JWT全程为JSON Web Tokens。它是一个将 JSON 对象进行编码且没有空格的长字符串的标准。字符串看起来像这样:
eyJhbGciOiJIUzI1NiIsInR5cCI6IkpXVCJ9.eyJzdWIiOiIxMjM0NTY3ODkwIiwibmFtZSI6IkpvaG4gRG9lIiwiaWF0IjoxNTE2MjM5MDIyfQ.SflKxwRJSMeKKF2QT4fwpMeJf36POk6yJV_adQsswc
它虽然是一段字符串,但是它包含了JSON内容以及一些特殊数据,这些将其反编译后就可以取得。
之所以使用JWT作为返回内容,而不是JSON,是因为它更小,并且可以设置有效时间,当有效时间过期则无法使用,所有具有一定安全性。
整个流程中 我们在登录成功后 将其用户的信息 加密为JWT,然后用户在请求时携带上JWT,再将其解码来判断身份。
JWT实现
需要安装 python-jose 以在 Python 中生成和校验 JWT 令牌:
$ pip install python-jose
其中 python-jose 需要一个额外的加密后端 依赖,这里我们使用的是推荐的后端:cryptography。
$ pip install cryptography
在生成JWT之前需要一个随机的安全密匙,相当于门锁钥匙,它依赖匹配对应的JWT(门锁)。
要生成一个安全的随机密钥,可使用以下命令:
$ openssl rand -hex 32
在项目中定义一个变量 「SECRET_KEY」,然后把它用在里面(这里是随机的内容,不要无脑复制)。
还要创建用于设定 JWT 令牌签名算法的变量 「ALGORITHM」,并将其设置为 "HS256"。
以及创建一个设置令牌过期时间的变量。
定义一个将在令牌端点中用于响应的 Pydantic 模型,用作认证后的返回模型。
from jose import JWTError, jwt

SECRET_KEY = "09d25e094faa6ca2556c818166b7a9563b93f7099f6f0f4caa6cf63b88e8d3e7"
ALGORITHM = "HS256"
ACCESS_TOKEN_EXPIRE_MINUTES = 30

class Token(BaseModel):
    access_token: str
    token_type: str
创建一个生成新的访问令牌的工具函数。
def create_access_token(data: dict, expires_delta: Union[timedelta, None] = None):
    to_encode = data.copy()
    if expires_delta:
        expire = datetime.utcnow() + expires_delta
    else:
        expire = datetime.utcnow() + timedelta(minutes=15)
    to_encode.update({"exp": expire})
    encoded_jwt = jwt.encode(to_encode, SECRET_KEY, algorithm=ALGORITHM)
    return encoded_jwt
将它用用作在认证成功后的操作中,生成的JWT最后返回到access_token中:
@app.post("/token", response_model=Token)
async def login_for_access_token(form_data: OAuth2PasswordRequestForm = Depends()):
    user = authenticate_user(fake_users_db, form_data.username, form_data.password)
    if not user:
        raise HTTPException(
            status_code=status.HTTP_401_UNAUTHORIZED,
            detail="Incorrect username or password",
            headers={"WWW-Authenticate": "Bearer"},
        )
    access_token_expires = timedelta(minutes=ACCESS_TOKEN_EXPIRE_MINUTES)
    access_token = create_access_token(
        data={"sub": user.username}, expires_delta=access_token_expires
    )
    return {"access_token": access_token, "token_type": "bearer"}
这里设置JWT中JSON内容含有一个sub的键,存储着认证的用户名。
在其认证判断中根据这个JWT来进行解码,获取到认证的用户名:
class TokenData(BaseModel):
    username: Union[str, None] = None

async def get_current_user(token: str = Depends(oauth2_scheme)):
    credentials_exception = HTTPException(
        status_code=status.HTTP_401_UNAUTHORIZED,
        detail="Could not validate credentials",
        headers={"WWW-Authenticate": "Bearer"},
    )
    try:
        # JWT解码
        payload = jwt.decode(token, SECRET_KEY, algorithms=[ALGORITHM])
        # 获取到JWT中的JSON内容的值
        username: str = payload.get("sub")
        if username is None:
            raise credentials_exception
        token_data = TokenData(username=username)
    except JWTError:
        raise credentials_exception
    # 根据数据库查询这个用户信息
    user = get_user(fake_users_db, username=token_data.username)
    if user is None:
        raise credentials_exception
    return user

async def get_current_active_user(current_user: User = Depends(get_current_user)):
    if current_user.disabled:
        raise HTTPException(status_code=400, detail="Inactive user")
    return current_user
在实现了Hash加密和JWT后,运行整个项目。
像以前一样对应用程序进行认证。
使用如下凭证:
用户名: johndoe 密码: secret
这时,它返回了一个Token对象,其中access_token字段为JWT内容,将其内容用在/users/me/ 请求头部上,请求头名为“Authenticate”,便成功返回出认证的用户信息,注意 Authorization 首部 还需要 以 Bearer 开头。
这里只是简单的说明下其OAuth2在FastAPI的玩法,具体的还有Scope等权限控制方法,这个后面教程中再慢慢讲述,这里不做描述。
中间件
FastAPI支持向请求中添加中间件,从而使请求执行前先执行中间件内容,类似于过滤器。
创建中间件
要创建中间件你可以在中间件函数的顶部使用装饰器 @app.middleware("http").
中间件函数接受两个函数:
request.一个函数
call_next它将接收request作为参数.
- 这个函数将
request传递给相应的 路径操作. - 然后它将返回由相应的路径操作生成的
response.
- 这个函数将
简而言之 call_next(request) 相当于等待执行 完请求内容。
比如我们创建一个运行时间计算中间件,它将记录请求 的运行速度,并将其返回到响应的头部。
from fastapi import FastAPI, Request

@app.middleware("http")
async def add_process_time_header(request: Request, call_next):
    start_time = time.time()
    response = await call_next(request)
    process_time = time.time() - start_time
    response.headers["X-Process-Time"] = str(process_time)
    return response
由于call_next(request) 相当于等待执行 完请求内容,所以使用它时务必带上 await。
配置CORS
CORS又叫做 跨域资源共享,是当两个或者多个服务器进行相互请求时获取内容产生的过程。
在前后端分离下 ,前端服务器与后端服务器 有时会不在同一个服务器、同一个端口下,这时默认情况下前端浏览器不会允许请求来自另外一个后端服务器下的接口。要解决它,这个问题就是开发常常谈到的跨域设置。
浏览器在进行请求外部(非本服务器)的请求时就会自动在请求头部上进行加入“Origin”字段,这个字段将被认为请求发起方的来源。
FastAPI中是这样配置跨域设置的:
from fastapi.middleware.cors import CORSMiddleware

origins = ['*']

app.add_middleware(
    CORSMiddleware,
    allow_origins=origins,
    allow_credentials=True,
    allow_methods=["*"],
    allow_headers=["*"],
)
其中allow_origins表示允许的请求服务器地址,allow_methods、allow_headers表示允许的请求方法和请求头部。
其中allow_credentials - 表示指示跨域请求是否支持 cookies。默认是 False。另外,允许凭证时 allow_origins 不能设定为 ['*'],必须指定源。
如果它们配置为’*’的话,表示所有条件都能被允许。
但是对于allow_origins设置的话,在一些情况下会固定设置地址,放置他人滥用。
元数据和文档 URL
你可以在创建 FastAPI实例时 自定义几个元数据配置。
description = """
ChimichangApp API helps you do awesome stuff. 🚀

## Items

You can **read items**.

## Users

You will be able to:

* **Create users** (_not implemented_).
* **Read users** (_not implemented_).
"""

app = FastAPI(
    title="ChimichangApp",
    description=description,
    version="0.0.1",
    terms_of_service="http://example.com/terms/",
    contact={
        "name": "Deadpoolio the Amazing",
        "url": "http://x-force.example.com/contact/",
        "email": "dp@x-force.example.com",
    },
    license_info={
        "name": "Apache 2.0",
        "url": "https://www.apache.org/licenses/LICENSE-2.0.html",
    },
)
最终,接口文档就会是这样:
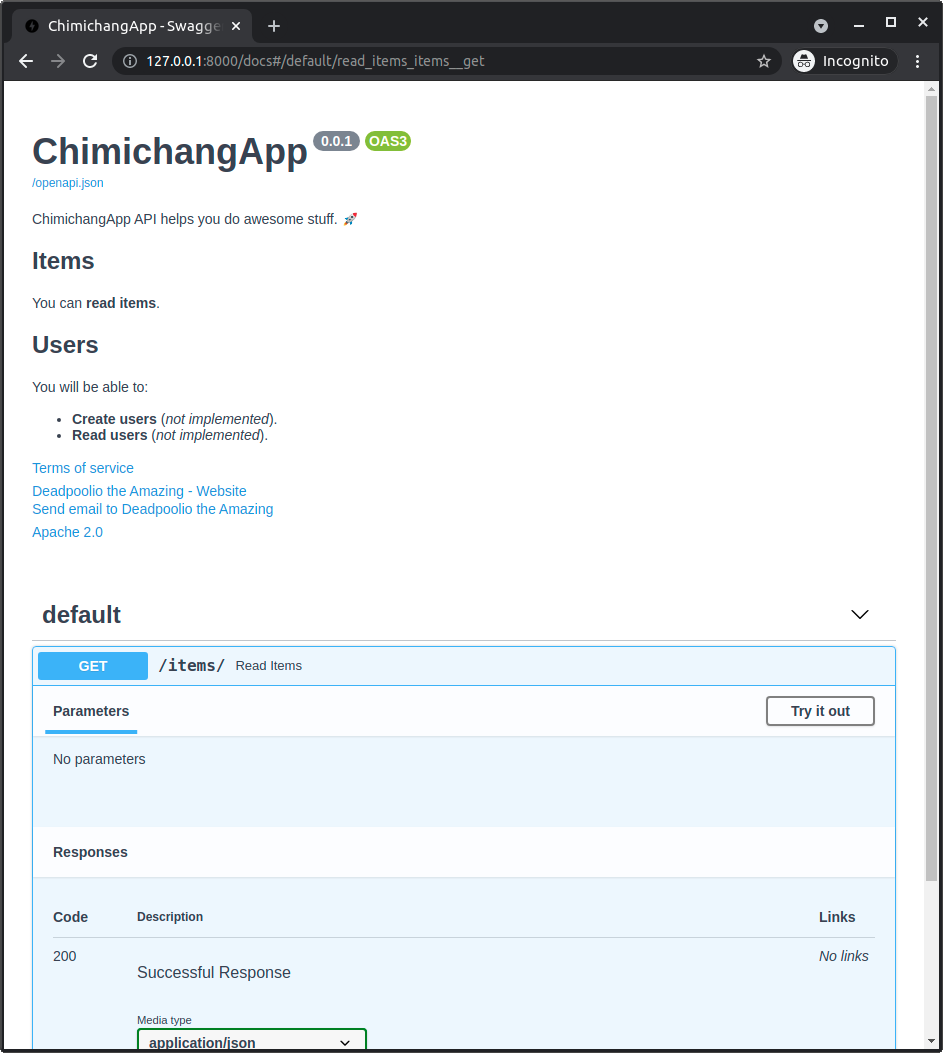
注意你可以在描述内使用 Markdown,例如「login」会显示为粗体(login)以及「fancy」会显示为斜体(fancy)。
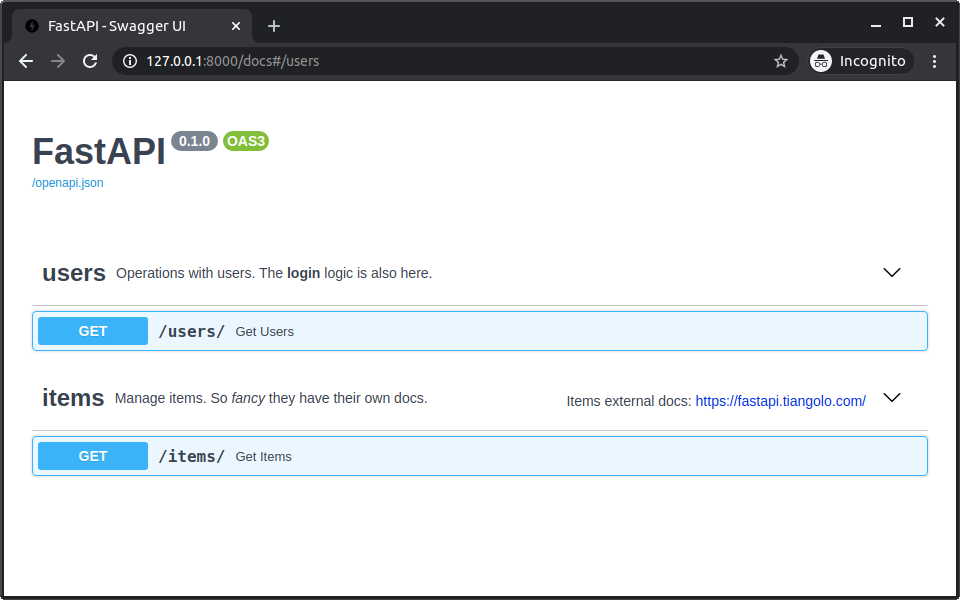
除了对文档主页面的定义修改之外,还可以对单独的标签组进行定义:
在创建FastAPI下传入openapi_tags参数:
tags_metadata = [
    {
        "name": "users",
        "description": "Operations with users. The **login** logic is also here.",
    },
    {
        "name": "items",
        "description": "Manage items. So _fancy_ they have their own docs.",
        "externalDocs": {
            "description": "Items external docs",
            "url": "https://fastapi.tiangolo.com/",
        },
    },
]

app = FastAPI(openapi_tags=tags_metadata)


@app.get("/users/", tags=["users"])
async def get_users():
    return [{"name": "Harry"}, {"name": "Ron"}]


@app.get("/items/", tags=["items"])
async def get_items():
    return [{"name": "wand"}, {"name": "flying broom"}]
里面的tags_metadata是一个列表,其中name对应的是响应的组名(tags)。
如果你现在查看文档,它们会显示附加的元数据:
最开始时,讲到FastAPI将会自动生成两个用户接口文档,分别是SwaggerUI、ReDoc。
它们的默认地址分别是“/docs”和“/redoc”,对于它们的页面地址可以自定义,在创建FastAPI时传入docs_url、redoc_url参数:
app = FastAPI(docs_url="/swagger", redoc_url="/redoc")
挂载静态资源
FastAPI支持挂载指定位置的静态资源。
虽然这在后端中并不是 非常常用,但是对于项目中指定文件可以通过这种方式直接访问。
导入StaticFiles(不管是fastapi包下的还是starlette包下的都可以),然后在FastAPI的实例后使用mount方法:
from fastapi import FastAPI
from fastapi.staticfiles import StaticFiles

app = FastAPI()

app.mount("/static", StaticFiles(directory="static"), name="static")
mount方法的第一个接受参数"/static"是指目录将被“挂载”到的服务器路径。因此,任何以它开头的路径"/static"都将由该目录映射。directory="static"指包含您的静态文件的目录的名称。而name="static"则是给它一个可以由FastAPI内部使用的名称。
测试
FastAPI提供了测试的方法。
它基于Starlette,而Starlette 的测试由基于Requests。
FastAPI测试需要将于pytest一起使用。
编写测试用例
对于Python测试而言,测试文件名以test_开头。
比如我们现在拥有一个简简单单的main.py文件为例:
from typing import Union

from fastapi import FastAPI, Header, HTTPException
from pydantic import BaseModel

fake_secret_token = "coneofsilence"

fake_db = {
    "foo": {"id": "foo", "title": "Foo", "description": "There goes my hero"},
    "bar": {"id": "bar", "title": "Bar", "description": "The bartenders"},
}

app = FastAPI()


class Item(BaseModel):
    id: str
    title: str
    description: Union[str, None] = None


@app.get("/items/{item_id}", response_model=Item)
async def read_main(item_id: str, x_token: str = Header()):
    if x_token != fake_secret_token:
        raise HTTPException(status_code=400, detail="Invalid X-Token header")
    if item_id not in fake_db:
        raise HTTPException(status_code=404, detail="Item not found")
    return fake_db[item_id]


@app.post("/items/", response_model=Item)
async def create_item(item: Item, x_token: str = Header()):
    if x_token != fake_secret_token:
        raise HTTPException(status_code=400, detail="Invalid X-Token header")
    if item.id in fake_db:
        raise HTTPException(status_code=400, detail="Item already exists")
    fake_db[item.id] = item
    return item
那么我们测试它,创建一个test_main.py文件。
导入TestClient(Fastapi包和Starlette包中的都可以),TestClient通过传递您的FastAPI实例创建。
对于测试函数,名称以 开头的函数test_(这是标准pytest约定)。
使用TestClient对象的方式与使用requests方法一样。所以里面的内容为:
from fastapi.testclient import TestClient

from .main import app

client = TestClient(app)


def test_read_item():
    response = client.get("/items/foo", headers={"X-Token": "coneofsilence"})
    assert response.status_code == 200
    assert response.json() == {
        "id": "foo",
        "title": "Foo",
        "description": "There goes my hero",
    }


def test_read_item_bad_token():
    response = client.get("/items/foo", headers={"X-Token": "hailhydra"})
    assert response.status_code == 400
    assert response.json() == {"detail": "Invalid X-Token header"}


def test_read_inexistent_item():
    response = client.get("/items/baz", headers={"X-Token": "coneofsilence"})
    assert response.status_code == 404
    assert response.json() == {"detail": "Item not found"}


def test_create_item():
    response = client.post(
        "/items/",
        headers={"X-Token": "coneofsilence"},
        json={"id": "foobar", "title": "Foo Bar", "description": "The Foo Barters"},
    )
    assert response.status_code == 200
    assert response.json() == {
        "id": "foobar",
        "title": "Foo Bar",
        "description": "The Foo Barters",
    }


def test_create_item_bad_token():
    response = client.post(
        "/items/",
        headers={"X-Token": "hailhydra"},
        json={"id": "bazz", "title": "Bazz", "description": "Drop the bazz"},
    )
    assert response.status_code == 400
    assert response.json() == {"detail": "Invalid X-Token header"}


def test_create_existing_item():
    response = client.post(
        "/items/",
        headers={"X-Token": "coneofsilence"},
        json={
            "id": "foo",
            "title": "The Foo ID Stealers",
            "description": "There goes my stealer",
        },
    )
    assert response.status_code == 400
    assert response.json() == {"detail": "Item already exists"}
这里的测试方法主要是 通过使用get、post等请求手段获取到响应对象,再利用assert断言进行与 与其进行对比。
注意测试功能是正常的
def,不是async def。并且对客户端的调用也是正常调用,而不是使用
await.这使您可以
pytest直接使用而不会出现并发问题。当然如果对于需要异步测试的情况下,就需要更深入的手段,具体后面再简绍。
运行测试
要运行测试,就需要安装pytest:
$ pip install pytest
安装完毕后,在终端中输入:
$ pytest
pytest将自动寻找项目中的test_开头的py文件,进行测试。
当然对于单个测试文件运行 在后面加上具体文件路径即可。如果要使pytest只输出结果和错误的话,在后面加上-q参数,进入安静模式即可。
环境变量
在许多情况下,您的应用程序可能需要一些外部设置或配置,例如密钥、数据库凭证、电子邮件服务凭证等。
这些设置中的大多数都是可变的(可以更改),例如数据库 URL。许多人可能很敏感,比如秘密。
出于这个原因,通常在应用程序读取的环境变量中提供它们。
在FastAPI中可以将其需要设置为环境变量的数据创建为Pydantic模型,Pydantic 提供了一个BaseSettings类用作环境变量模型类。
from fastapi import FastAPI
from pydantic import BaseSettings


class Settings(BaseSettings):
    app_name: str = "Awesome API"
    admin_email: str
    items_per_user: int = 50

settings = Settings()
app = FastAPI()

@app.get("/info")
async def info():
    return {
        "app_name": settings.app_name,
        "admin_email": settings.admin_email,
        "items_per_user": settings.items_per_user,
    }
值得注意的是环境变量模型中的属性名不区分大小写,也就是说这里的settings.app_name也可以写作settings.APP_NAME依然可以识别。
当然正常情况下你一般将配置模型放到一个独立的文件下,比如创建一个config.py:
from pydantic import BaseSettings


class Settings(BaseSettings):
    app_name: str = "Awesome API"
    admin_email: str
    items_per_user: int = 50


settings = Settings()
在需要使用的地方引用即可。
接下来,您运行应用时 将相关配置数据作为环境变量传入:
$ ADMIN_EMAIL="deadpool@example.com" APP_NAME="ChimichangApp" uvicorn main:app
要为设置多个环境变量,只需将它们用空格分隔,并将它们全部放在运行命令之前。
当然上面这种做法对于几个配置设置是可行的,但是对于中大型项目来说,拥有的配置变量十分多,每次启动都进行单独输入十分不方便,而且容易出现错误。对于这种情况,往往采用使用外置配置文件来进行解决的。
在项目文件夹中创建一个.env文件,该文件称为“dotenv”,它是用来存储项目配置内容的文件,当每次项目启动后,读取该文件。
我们在项目根目录创建一个.env文件:
ADMIN_EMAIL="deadpool@example.com"
APP_NAME="ChimichangApp"
然后修改之前的config.py内容:
from pydantic import BaseSettings


class Settings(BaseSettings):
    app_name: str = "Awesome API"
    admin_email: str
    items_per_user: int = 50

    class Config:
        env_file = ".env"
这里在Settings内部新增一个Config子类,在这里配置env文件路径。
并且删除了之前的settings = Settings()内容,删除它的原因就是每次使用时再进行实例化,而不是全局使用。
在使用配置数据的地方的代码是这样的:
from functools import lru_cache
from . import config

@lru_cache()
def get_settings():
    return config.Settings()


@app.get("/info")
async def info(settings: config.Settings = Depends(get_settings)):
    return {
        "app_name": settings.app_name,
        "admin_email": settings.admin_email,
        "items_per_user": settings.items_per_user,
    }
这里采用依赖项的方式进行注入到使用的地方上,并且使用了@lru_cache()这个注解。
@lru_cache()的作用是 使该函数内部对象只实例化创建一次,后续使用全部重新调用。
之所以要使用这个功能,因为从磁盘读取文件通常是一项代价高昂(缓慢)的操作,对于配置文件内容往往只需要读取一次就可以了,减少处理时间。