Spring-Security教程(二) :核心教程
上一章节我们初步认识了SpringSecurity的入门使用,以及实现了JWT的无状态认证操作。
但是要想Spring-Security精通,就得掌握核心内容。
下面就是Spring Security一些核心内容教程。
Spring Security 资源放行策略
在上面教程中,我们使用过两种Spring Security放行方法:
在 configure(WebSecurity web) 方法中配置放行:
@Override
public void configure(WebSecurity web) throws Exception {
    web.ignoring().antMatchers("/css/**", "/js/**", "/index.html", "/img/**", "/fonts/**", "/favicon.ico", "/verifyCode");
}
在 configure(HttpSecurity http) 方法中进行配置放行:
http.authorizeRequests()
        .antMatchers("/hello").permitAll()
        .anyRequest().authenticated()
咋一看这两种都是放行URL处理,没什么区别呀。
其实最大的区别在于,第一种方式在configure(WebSecurity web)中 是不走 Spring Security 过滤器链,而第二种方式configure(HttpSecurity http)中 是走 Spring Security 过滤器链,在过滤器链中,给请求放行。
如何做使用区分:
比如有的资源可以使用第一种方式额外放行,它们根本不需要验证,类似于在SpringBoot配置中进行放行,例如前端页面的静态资源,就可以按照第一种方式配置放行。
比如有的资源放行,则必须使用第二种方式,例如登录接口,因为虽然登录接口的Get访问不需要Spring Security身份认证,但是它的Post需要进行认证,所以必须要走 Spring Security 过滤器。
默认认证流程解析
AuthenticationProvider-认证方式提供
Spring Security框架 用户认证逻辑 由AuthenticationProvider 这个接口来进行定义:
public interface AuthenticationProvider {

   /**
使用与AuthenticationManager.authenticate(Authentication)相同的合同执行身份AuthenticationManager.authenticate(Authentication) 。
参数:
身份验证 - 身份验证请求对象。
返回值:
一个完全经过身份验证的对象,包括凭据。 如果AuthenticationProvider无法支持对传递的Authentication对象进行身份验证,则可能返回null 。 在这种情况下,将尝试支持呈现的Authentication类的下一个AuthenticationProvider 。
顶:
AuthenticationException – 如果身份验证失败。
    */
   Authentication authenticate(Authentication authentication) throws AuthenticationException;

   /**
如果此AuthenticationProvider支持指定的Authentication对象,则返回true 。
返回true并不能保证AuthenticationProvider将能够对Authentication类的呈现实例进行Authentication 。 它只是表明它可以支持对其进行更深入的评估。 AuthenticationProvider仍然可以从authenticate(Authentication)方法返回null以指示应该尝试另一个AuthenticationProvider 。
能够执行身份验证的AuthenticationProvider选择在ProviderManager运行时进行。
参数:
验证 -
返回值:
如果实现可以更仔细地评估呈现的Authentication类,则为true
    */
   boolean supports(Class<?> authentication);
其中authenticate(Authentication authentication)这个方法用于身份认证,这个方法在登录时会自动调用,原因后面说。
而supports(Class<?> authentication) 这个方法来判断当前的 AuthenticationProvider 是否支持对应的 Authentication。
Authentication-认证凭证
这里需要的authentication,上面接触过,它就是用户的认证身份,上面记录了用户的各种登录信息,就像身份证一样。
public interface Authentication extends Principal, Serializable {
Collection<? extends GrantedAuthority> getAuthorities();
Object getCredentials();
Object getDetails();
Object getPrincipal();
boolean isAuthenticated();
void setAuthenticated(boolean isAuthenticated) throws IllegalArgumentException;
}
authentication可以在用户登录成功被创建,可以在之后使用SecurityContext.getContext().getAuthentication()获取。
SpringSecurity默认 使用的是 Authentication实现类是UsernamePasswordAuthenticationToken 。它是一个简单的authentication实现,他只有principal(用户对象?用户名)、credentials(用户登录凭证)。如果上面一比一来的,可能会发现其实我们在JWTProvider解析JWT中也是最后返回的这个。
回到AuthenticationProvider 来,当用户通过使用Token请求一个需要认证的接口后,JWT过滤器将其先解析后的authentication放置到SecurityContext中后,Spring Security就会自动触发AuthenticationProvider的supports方法,它主要是来认证这个authentication是否符合 authenticate方法中的authentication(就问你昏不)。
AbstractAuthenticationToken-Authentication对象的实现
它是Authentication对象的实现基类,在SpringSecurity默认认证下,使用的是它的子类UsernamePasswordAuthenticationToken,旨在用于简单地呈现用户名和密码。
DaoAuthenticationProvider-一种认证方式提供
而AuthenticationProvider 接口实现类的DaoAuthenticationProvider 是我们目前最常用的。DaoAuthenticationProvider 的父类 AbstractUserDetailsAuthenticationProvider 中我们可以看见其authenticate()方法的内容,它就是默认Spring Security的认证逻辑:
@Override
    public Authentication authenticate(Authentication authentication) throws AuthenticationException {
        // 断言比较获取的Authentication是否为 UsernamePasswordAuthenticationToken
        Assert.isInstanceOf(UsernamePasswordAuthenticationToken.class, authentication,
                () -> this.messages.getMessage("AbstractUserDetailsAuthenticationProvider.onlySupports",
                        "Only UsernamePasswordAuthenticationToken is supported"));
        // 获取用户名
        String username = determineUsername(authentication);
        // 默认开启缓存
        boolean cacheWasUsed = true;
        // 从缓存中获取用户信息
        UserDetails user = this.userCache.getUserFromCache(username);
        if (user == null) {
            // user为null,那么没有使用缓存
            cacheWasUsed = false;
            try {
                // retrieveUser来获取用户信息
                // 实际上就是 从设置的UserDetailsService 中获取用户信息
                user = retrieveUser(username, (UsernamePasswordAuthenticationToken) authentication);
            }
            catch (UsernameNotFoundException ex) {
                this.logger.debug("Failed to find user '" + username + "'");
                if (!this.hideUserNotFoundExceptions) {
                    throw ex;
                }
                throw new BadCredentialsException(this.messages
                        .getMessage("AbstractUserDetailsAuthenticationProvider.badCredentials", "Bad credentials"));
            }
            // 断言user 是否还是为空
            Assert.notNull(user, "retrieveUser returned null - a violation of the interface contract");
        }
        try {
            // 检验用户信息权限状态,例如账户是否被禁用、账户是否被锁定、账户是否过期等等。
            this.preAuthenticationChecks.check(user);
            // 密码认证,通过其Authentication.getCredentials()和UserDetails.getPassword()对比
            additionalAuthenticationChecks(user, (UsernamePasswordAuthenticationToken) authentication);
        }
        catch (AuthenticationException ex) {
            if (!cacheWasUsed) {
                throw ex;
            }
            // There was a problem, so try again after checking
            // we're using latest data (i.e. not from the cache)
            cacheWasUsed = false;
            user = retrieveUser(username, (UsernamePasswordAuthenticationToken) authentication);
            this.preAuthenticationChecks.check(user);
            additionalAuthenticationChecks(user, (UsernamePasswordAuthenticationToken) authentication);
        }
        this.postAuthenticationChecks.check(user);
        if (!cacheWasUsed) {
            this.userCache.putUserInCache(user);
        }
        Object principalToReturn = user;
        if (this.forcePrincipalAsString) {
            principalToReturn = user.getUsername();
        }
        return createSuccessAuthentication(principalToReturn, authentication, user);
    }
其中的additionalAuthenticationChecks 在DaoAuthenticationProvider中 调用了PasswordEncoder.matches方法,这也就是我们之前说登录时验证为什么调用了PasswordEncoder.matches的原因。
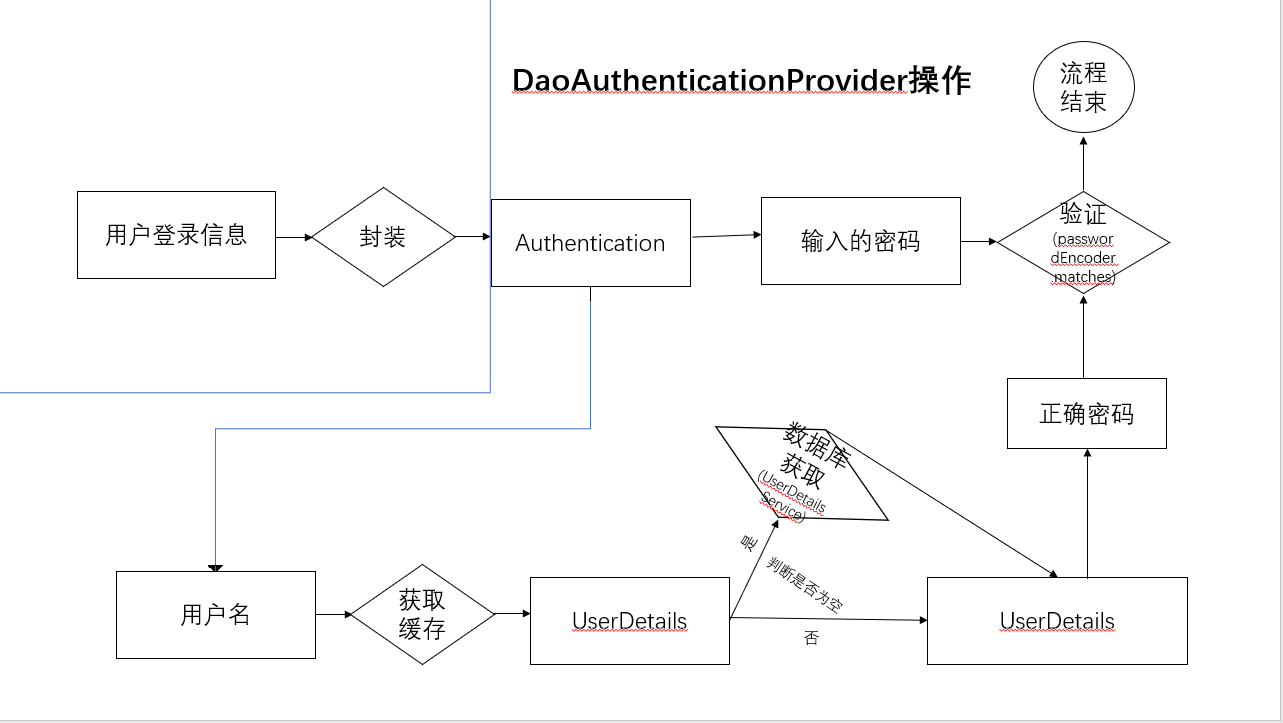
登录认证流程图
所以ALL-IN-ALL,登录认证就是在登录时候将其输入的登录信息 封装为Authentication ,然后在跟其 数据库中的正确信息进行对比。将其流程整理为图:
AuthenticationManager-处理Authentication请求
AuthenticationManager是一个顶级接口,它主要方法authenticate用来处理身份验证请求,它的默认实现ProviderManager类,所以正常情况使用ProviderManager做处理。
ProviderManager-认证方式提供管理器
AuthenticationProvider 都是通过 ProviderManager的authenticate 方法来调用的。由于我们的一次认证可能会存在多个 AuthenticationProvider,所以,在 ProviderManager的authenticate 方法中会逐个遍历 AuthenticationProvider,并调用他们的 authenticate 方法做认证,这也是为什么AuthenticationProvider 会自动调用authenticate 来认证。
public Authentication authenticate(Authentication authentication)
        throws AuthenticationException {
    ...
    for (AuthenticationProvider provider : getProviders()) {
        result = provider.authenticate(authentication);
        if (result != null) {
            copyDetails(authentication, result);
            break;
        }
    }
    ...
}
自定义认证逻辑
了解了Spring Security的默认认证模式以及思路后,我们就是可以自定义实现认证逻辑了。
为什么要自定义实现认证逻辑呢?
上面的认证逻辑都是基于默认的“/login”进行操作的,使用Spring的方法自己写了个login接口,而这里面的逻辑全是Service来进行处理的,相当于并没有使用Spring Security的认证逻辑,只是写了个JWT过滤器做header处理而已。
自定义认证逻辑可以完全重新SpringSecurity认证逻辑,设计更合理,避免大材小用。
编写自定义AuthenticationProvider
要实现自定义认证逻辑的关键就是要实现一个自定义AuthenticationProvider。
比如 我们需要在原本的Spring Security登录接口逻辑中添加一个验证码校验逻辑。
上面说明了,默认的Spring Security使用的DaoAuthenticationProvider做AuthenticationProvider的,所以我们需要重写它,然后在其验证方法additionalAuthenticationChecks中增加逻辑判断:
/**
 * @description: 自定义验证逻辑提供类
 * @author: Zhaotianyi
 * @time: 2021/11/22 10:10
 */
public class MyAuthenticationProvider extends DaoAuthenticationProvider {
    @Resource
    private ImgValidService imgValidService;

   @Override
    protected void additionalAuthenticationChecks(UserDetails userDetails, UsernamePasswordAuthenticationToken authentication) throws AuthenticationException,ServiceException {
        HttpServletRequest req = ((ServletRequestAttributes) RequestContextHolder.getRequestAttributes()).getRequest();
        // 获取请求中的验证码信息
        String validKey = req.getParameter("validKey");
        String verifyCode = req.getParameter("verifyCode");
        try {
            String cacheVerifyCode = imgValidService.get(validKey);
            // 进行判断验证码是否正确
            if (!verifyCode.toLowerCase().equals(cacheVerifyCode)){
                Result result = ResultBuilder.failResult("身份错误,请重新登录!");
                throw new ServiceException("验证码输入错误");
            }
        } catch (Exception e) {
            throw new ServiceException("验证码状态错误");
        }
        super.additionalAuthenticationChecks(userDetails, authentication);
    }
}
RequestContextHolder.getRequestAttributes()).getRequest() 获取请求,通过请求获取输入的验证码内容,然后进行检验验证码,最后在调用父类逻辑。这样一个实现验证码检验的自定义认证逻辑就完成了。
但是完成后,还需要将其配置到Spring Security中去。
Spring Security配置AuthenticationProvider
上面已经说了,所有的 AuthenticationProvider 都是放在 ProviderManager 中统一管理的,要实现加载自定义的AuthenticationProvider,就需要自己提供 ProviderManager。这一切操作都能在 Spring Security Config 中完成:
@Configuration
@EnableGlobalMethodSecurity(prePostEnabled = true)
public class SecurityConfig extends WebSecurityConfigurerAdapter {
    @Autowired
    private UserDetailsService userDetailsService;

    /**
     * 自定义密码认证
     */
    @Bean
    public PasswordEncoder passwordEncoder() {
        return new MD5PasswordEncoder();
    }

    /**
     * 自定义AuthenticationProvider
     */
    @Bean
    public MyAuthenticationProvider myAuthenticationProvider() {
        MyAuthenticationProvider myAuthenticationProvider = new MyAuthenticationProvider();
        // 设置密码认证
        myAuthenticationProvider.setPasswordEncoder(passwordEncoder());
        // 设置用户信息查询服务
        myAuthenticationProvider.setUserDetailsService(userDetailsService);
        return myAuthenticationProvider;
    }

    /**
     * 自定义AuthenticationManager
     */
    @Override
    protected AuthenticationManager authenticationManager() {
        // 加载自定义自定义AuthenticationProvider
        ProviderManager manager = new ProviderManager(Arrays.asList(myAuthenticationProvider()));
        return manager;
    }

    ...
}
ProviderManager构造器接受一个list,可以设置多个自定义AuthenticationProvider进去,然后依次执行。
需要注意的是自定义AuthenticationProvider还需要设置其 密码认证方式 和 用户信息服务,否则会应用父类的设置。
最后我们测试:
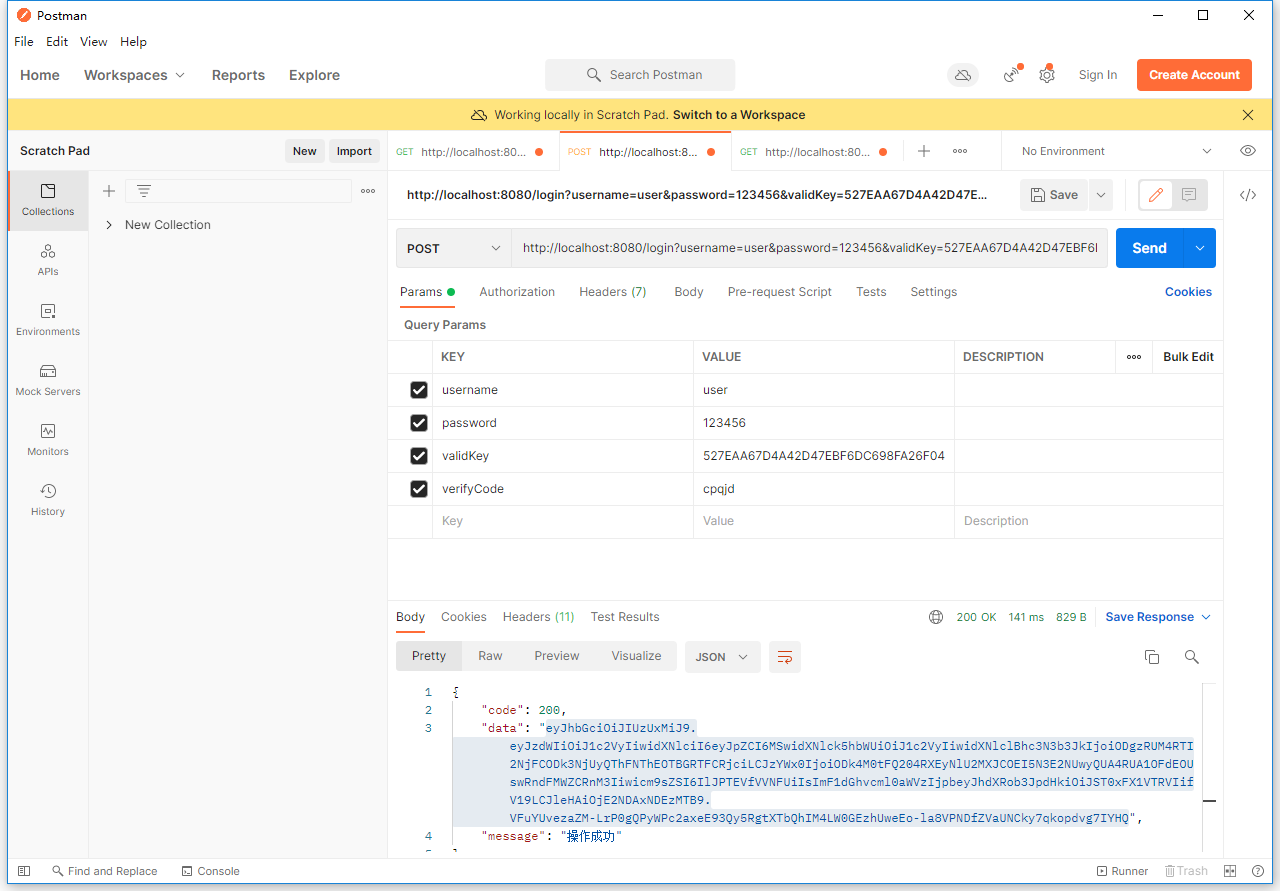
默认的”/login”登录接口就能实现验证码验证功能了。
自定义登录接口
对于上面的自定义认证逻辑,我们也可以在自己的登录接口中,手动进行认证操作,具体操作如下:
密码验证:
MD5PasswordEncoder md5PasswordEncoder=new MD5PasswordEncoder();
// 密码验证操作
boolean flag = md5PasswordEncoder.matches(password, userEntity.getPassword());
验证通过后,手动生成Authentication对象。
UsernamePasswordAuthenticationToken upToken = new UsernamePasswordAuthenticationToken(userEntity.getUsername(), password);
Authentication authentication = authenticationManager.authenticate(upToken);
SecurityContextHolder.getContext().setAuthentication(authentication);
多个数据库登录
有时候,可能需要多个平台的用户登录进服务器,比如A公司不仅可以使用A公司账户登录,还可以使用B公司账户登录等等。
对于这种情况来说,我们或许会想到多个自己写一个登录接口还实现多次查询登录。
其实通过自定义配置认证逻辑既可以实现这种功能。
上面讲述默认认证逻辑的时候,提到了ProviderManager,它是一个可以拥有多个AuthenticationProvider的管理器,ProviderManager内的AuthenticationProvider都会被依次按照顺序来执行。所以我们可以自定义设置两个AuthenticationProvider,它们实现不一样的用户查询UserDetailsService即可。
@Override
public Authentication authenticate(Authentication authentication) throws AuthenticationException {
    ...
    try {
            this.preAuthenticationChecks.check(user);
            additionalAuthenticationChecks(user, (UsernamePasswordAuthenticationToken) authentication);
    }
    ...
}
其实,还有更简单的,如果是使用的是DaoAuthenticationProvider父类的话,我们直接可以通过setUserDetailsService进行设定自己的UserDetailsService即可:
@Configuration
public class SecurityConfig extends WebSecurityConfigurerAdapter {
    ...
    @Override
    @Bean
    protected AuthenticationManager authenticationManager() throws Exception {
        DaoAuthenticationProvider dao1 = new DaoAuthenticationProvider();
        dao1.setUserDetailsService(us1());

        DaoAuthenticationProvider dao2 = new DaoAuthenticationProvider();
        dao2.setUserDetailsService(us2());

        ProviderManager manager = new ProviderManager(dao1, dao2);
        return manager;
    }
    ...
}
对于UserDetailsService中使用多个数据库查询,需要应用到切换连接池,这儿不做讲述。
使用注解进行权限控制
Spring Security中可以在配置类的configure方法中进行设置权限控制:
@Override
    protected void configure(HttpSecurity http) throws Exception {
        http
                .authorizeRequests()
                .antMatchers("/product/**").hasRole("USER") //添加/product/** 下的所有请求只能由user角色才能访问
                .antMatchers("/admin/**").hasRole("ADMIN") //添加/admin/** 下的所有请求只能由admin角色才能访问
                .anyRequest().authenticated() // 没有定义的请求,所有的角色都可以访问(tmp也可以)。
                ...
    }
但是对于这样一个一个接口进行权限控制,非常麻烦。
玩个Shiro的大伙都知道,可以在控制层中对接口使用Java注解可以快速设置其权限控制。Spring Security也可以这样做。
使用注解前需要在配置类前添加@EnableGlobalMethodSecurity(prePostEnabled = true)注解。
其中prePostEnabled默认为false,需要设置为true后才能全局的注解权限控制。
@Configuration
@EnableGlobalMethodSecurity(prePostEnabled = true)
public class SecurityConfig extends WebSecurityConfigurerAdapter {
    ...
}
Spring Security权限控制注解有如下几个:
@PreAuthorize : 在接口请求之前就进行权限判断
@GetMapping("/info")
@PreAuthorize("hasRole('USER')")
// @PreAuthorize("hasAuthority('ROLE_ADMIN')")
public Result info(){
    ...
}
hasRole和hasAuthority都会对UserDetails中的getAuthorities进行判断,两个区别的就是,hasRole会对字段自动加上ROLE_再进行判断,这样更加方便(Spring Security的角色数据库中都有一个ROLE_前缀)。
@PostAuthorize : 在接口请求之后进行判断,如果返回值不满足条件,会抛出403异常,但是接口本身是会执行的。
@PostAuthorize("returnObject.id%2==0")
public School postAuthorize(Long id) {
    XXX xxx = new XXX();
    xxx.setId(id);
    return xxx;
}
returnObject是内置对象,引用的是下面方法的返回值(这里就是xxx对象)。 判断下 为true的值则通过认证。
@PreFilter:在接口请求执行之前,用于过滤。
@PreFilter(filterTarget="ids", value="filterObject%2==0")
public List<Long> preFilter(@RequestParam("ids") List<Long> ids) {
return ids;
}
filterObject是内置对象,引用的是集合中的泛型类,如果有多个集合,需要指定filterTarget,即参数。判断下 为true的值,参数会保留,否则参数就会被移除。
@PostFilter: 在接口请求之后,对返回的集合进行过滤。
@PostFilter("filterObject.id%2==0")
public List<Long> preFilter(@RequestParam("ids") List<Long> ids) {
XXX xxx = new XXX();
xxx.setIds(ids);
return xxx;
}
SpringSecurity的Session实现
Spring Security默认 是怎么保存用户对象和 session 的?
Spring Security 中通过 SessionRegistryImpl 类来实现对会话信息的统一管理:
public class SessionRegistryImpl implements SessionRegistry,
ApplicationListener<SessionDestroyedEvent> {
/** <principal:Object,SessionIdSet> */
private final ConcurrentMap<Object, Set<String>> principals;
/** <sessionId:Object,SessionInformation> */
private final Map<String, SessionInformation> sessionIds;
/*
* 创建、注册新的Session
*/
public void registerNewSession(String sessionId, Object principal) {
Assert.hasText(sessionId, "SessionId required as per interface contract");
Assert.notNull(principal, "Principal required as per interface contract");
// 如果存在相同SessionID,就移除现有的Session
if (getSessionInformation(sessionId) != null) {
removeSessionInformation(sessionId);
}
// 添加到sessionIds 记录
sessionIds.put(sessionId,
new SessionInformation(principal, sessionId, new Date()));
principals.compute(principal, (key, sessionsUsedByPrincipal) -> {
if (sessionsUsedByPrincipal == null) {
sessionsUsedByPrincipal = new CopyOnWriteArraySet<>();
}
sessionsUsedByPrincipal.add(sessionId);
return sessionsUsedByPrincipal;
});
}
public void removeSessionInformation(String sessionId) {
SessionInformation info = getSessionInformation(sessionId);
if (info == null) {
return;
}
sessionIds.remove(sessionId);
principals.computeIfPresent(info.getPrincipal(), (key, sessionsUsedByPrincipal) -> {
sessionsUsedByPrincipal.remove(sessionId);
if (sessionsUsedByPrincipal.isEmpty()) {
sessionsUsedByPrincipal = null;
}
return sessionsUsedByPrincipal;
});
}
@Override
public SessionInformation getSessionInformation(String sessionId) {
Assert.hasText(sessionId, "SessionId required as per interface contract");
return this.sessionIds.get(sessionId);
}
}
其中声明了一个 principals对象,它是一个支持并发访问的Map集合,key为用户的用户对象(具体由登录成功的Authentication中来的),而集合的 value 则是一个 set 集合,这个 set 集合中保存了这个用户对应的 sessionid。
当登录成功一个用户,新的 session 需要添加,就在 registerNewSession 方法中进行添加,具体是调用 principals.compute 方法进行添加,key 就是 principal。
如果用户注销登录,sessionid 需要移除,相关操作在 removeSessionInformation 方法中完成,具体也是调用 principals.computeIfPresent 方法。
Spring Security Session与Vue前后端分离项目问题
我们使用默认的Session作为Spring Security的身份认证的话,前后端分离的限制登录会没有作用。
protected void configure(HttpSecurity http) throws Exception {
    http.authorizeRequests()
            ...
            .and()
            .formLogin()
            .loginPage("/login.html")
            .loginProcessingUrl("/doLogin")
            ...
            .and()
            .sessionManagement()
            .maximumSessions(1);
}
打开多个浏览器,分别进行多端登录测试,就会发现每个浏览器都能登录成功,每次登录成功也不会踢掉已经登录的用户!
因为前后端分离使用Session的话,我们通常会自己实现一个UserDetails(默认的User中没用一些自定义属性) 来进行Session存储。然而上面简绍了SessionRegistryImpl 中的principals对象中key就需要存储了它,所以如果没有重写自定义的UserDetails的equals和hashCode方法的话就会造成覆盖问题。
所以我们需要重写自定义的UserDetails的equals和hashCode方法:
public class MyUser implements UserDetails {
@Id
@GeneratedValue(strategy = GenerationType.IDENTITY)
private Long id;
private String username;
private String password;
private boolean accountNonExpired;
private boolean accountNonLocked;
private boolean credentialsNonExpired;
private boolean enabled;
@ManyToMany(fetch = FetchType.EAGER,cascade = CascadeType.PERSIST)
private List<Role> roles;
...
@Override
public boolean equals(Object o) {
if (this == o) return true;
if (o == null || getClass() != o.getClass()) return false;
User user = (User) o;
return Objects.equals(username, user.username);
}
@Override
public int hashCode() {
return Objects.hash(username);
}
...
...
}
Session集群共享
在普通情况下/或者需要管理登录情况下,使用Spring Security自带的Session进行认证操作更加方便。
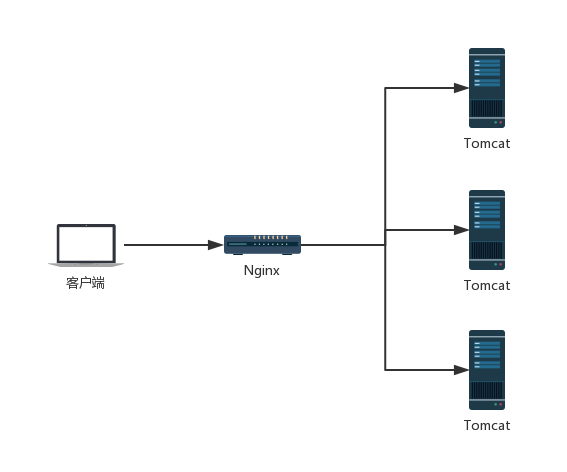
在传统的单服务框架中,一般只有一个后台服务器,那么不存在Session共享问题。
但是如今中大型项目中,都是采用的分布式集群设计,有多台服务器,那么由于需要实现负载均衡,每次访问的服务器都可能不一致,那么Session就需要实现互相共享。
为了解决共享问题,目前主流的解决方案就是将其各个服务器需要共享的数据,统一保存在一个服务器中,通过这个服务器来实现统一保存。为了不影响用户的体验,通常这个服务器通常使用缓存服务器,如Redis等。
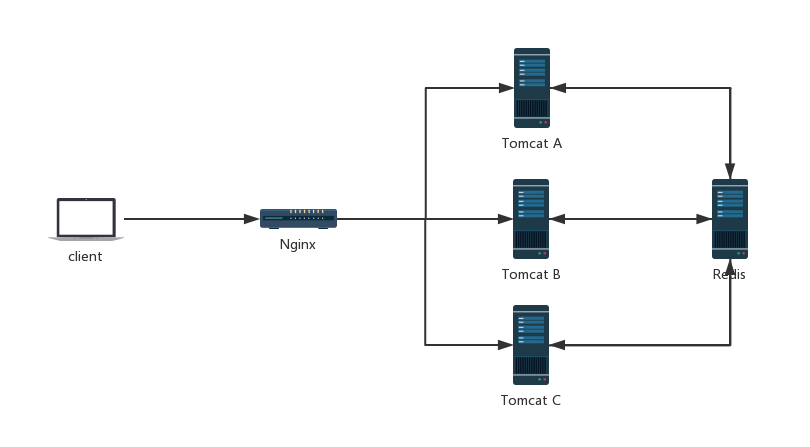
当所有 Tomcat 需要往 Session 中写数据时,都往 Redis 中写,当所有 Tomcat 需要读数据时,都从 Redis 中读。这样,不同的服务就可以使用相同的 Session 数据了。
这样的方案,可以由开发者编写代码手动实现,即往 Redis 中存储数据、从 Redis 中读取数据,相当于使用一些 Redis 工具来实现这样的功能,毫无疑问,这样工作量会增加,并且可能会有问题出现。
目前一个简化的方案就是使用 Spring官方的Spring Session 来实现这一功能,Spring Session 就是使用 Spring 中的代理过滤器,将所有的 Session 操作拦截下来,自动的将数据 同步到 Redis 中,或者自动的从 Redis 中读取数据,从而操作Session和普通的方式一样。
具体操作:
向项目添加``spring-boot-starter-data-redis和spring-session-data-redis`依赖
<dependency>
    <groupId>org.springframework.boot</groupId>
    <artifactId>spring-boot-starter-data-redis</artifactId>
</dependency>
<dependency>
    <groupId>org.springframework.session</groupId>
    <artifactId>spring-session-data-redis</artifactId>
</dependency>
在配置文件中配置Redis基本属性,这儿就不做讲述了。
配置完成后 ,使用普通的 HttpSession 执行操作,那么 Spring Session就会自动将其 Session 操作同步到 Redis 等操作,这些操作框架已经自动帮你完成了:
@RestController
public class HelloController {
    @Value("${server.port}")
    Integer port;
    @GetMapping("/set")
    public String set(HttpSession session) {
        session.setAttribute("user", "javaboy");
        return String.valueOf(port);
    }
    @GetMapping("/get")
    public String get(HttpSession session) {
        return session.getAttribute("user") + ":" + port;
    }
}
这里设计了两个接口,一个用来向Session中写入内容,一个用来向Session中读取内容。考虑到项目会以集群方式启动,特意加上了端口号,来确定哪台服务器执行了接口。
我们运行同样两个服务器(端口不一样),然后先访问 一台服务器的set接口向其Session中存一个变量,第一次访问时会自动跳转到SpringSecurity登录页面,输入用户名密码进行登录即可。访问成功后,数据就已经自动同步到 Redis 中 了 :

然后,再调用 另外一台服务器的get接口,就可以获取到Redis的 session 中的数据了,从而就实现了Session共享。
权限管理
上述的认证是基于Role角色来进行的,在控制认证中也都是以用户角色为主。这对于一些小型系统来说足够了。
但是对于一些中大型系统来说,这种仅依靠角色来进行认证操作是十分粗犷的,因为在中大型后台中,其中操作分的十分的细,XXX操作只能XXX来进行,XXX操作不能进行XXX操作,单靠角色来进行这样的操作,那么就会建立不知道多少角色,并且难以管理,所以我们这时务必使用角色-权限进行操作授权管理。
这里就会出现一种模型:RBAC
RBAC(Role-based access control),目前使用最多的权限模型。它使用角色进行基础归类,通过用户的角色来确定用户对某项资源是否具备操作权限。用白话说就是:用户拥有角色标识,角色拥有对应权限,通过对角色进行分配权限,用户就自动拥有对应权限。
所以,实现RBAC模型,那么就必须至少拥有3个数据库表,role表、permission表(或者menu表)、role-permission表(或者role-menu表)。
- role表:管理用户角色列表。
- permission表:权限表,用于记录各个组件的权限信息。
- role-permission表:角色拥有的权限表,用于记录角色拥有的权限信息。
整个授权操作就是-通过用户角色id去role-permission表查询拥有的permission,然后在permission表进行获取相关权限内容。
对于对角色权限添加操作,我们可以通过UserDetailsService中,loadUserByUsername方法查询中进行添加对应逻辑:
@Override
public UserDetails loadUserByUsername(String login) throws UsernameNotFoundException {
...
// 设置角色和权限
Integer roleId = userFromDatabase.get(0).getRole();
Role role = roleMapper.selectByPrimaryKey(roleId);
List<Permission> permissionList = rolePermissionService.getHasPermissionList(role.getId());
Collection<GrantedAuthority> grantedAuthorities = new ArrayList<>();
for (Permission p : permissionList) {
if (p.getPermissionType() == 2) {
grantedAuthorities.add(new SimpleGrantedAuthority(p.getPath() + ":" + p.getMethod()));
}
}
grantedAuthorities.add(new SimpleGrantedAuthority(role.getRoleName()));
...
return new User(login, allEncoded, grantedAuthorities);
}
前面的操作就是正常的CRUD,其中getHasPermissionList方法是通过角色ID获取拥有权限列表,这儿不概述。
这里grantedAuthorities是一个GrantedAuthority集合,GrantedAuthority是Spring Security的权限接口,它也有一个常用的实现类SimpleGrantedAuthority,我们轮流将其权限表的权限安装 相应要求 加入grantedAuthorities集合中,代表对用户注入权限。
最后不要忘记将角色名也同样方法添加进去。
这里有些人会迷惑,为什么角色和权限都一起放进去?权限认证时如何进行区分呢?
其实前面数据库实现用户登录 那儿 就说了,Spring Security在4.x版本后,角色都需要被加上“ROLE_”前缀,所以这里我们要在Role表中的角色设为“ROLE_XXX”,比如admin就得是“ROLE_admin”。拥有‘ROLE_ _ ’的前缀的权限会自动过滤识别为角色。
当然对于一些较大型的系统的话,权限查询授权 就尽量不要放置在 UserDetailsService中了,因为前面在介绍默认认证流程说了,Spring Security在进行登录密码认证操作前就会查询用户,所以当用户即使认证错误也会进行用户授权查询操作,造成登录过程缓慢。
我们可以自定义实现一个DaoAuthenticationProvider,去重写authenticate(Authentication authentication)方法,在其additionalAuthenticationChecks密码认证方法执行后,去实现用户授权操作,这样只有用户密码认证成功后,才进行用户授权查询。这些具体操作可以参考上面的 自定义认证逻辑。
由于我们使用了JWT认证,我们为了保证每次权限认证时的流畅性,我们登录时生成JWT时,将其权限存储进JWT或者Ehcache中,以免每次都进行权限查询。
对于其JAVA注解控制,我们就可以这样随意根据权限 使用了:
//拥有write权限
@GetMapping("/write")
@PreAuthorize("hasAuthority('write')")
public String getWrite() {
    return "have a write authority";
}

//admin角色
@GetMapping("/admin-role")
@PreAuthorize("hasRole('admin')")
public String readAdmin() {
    return "have a admin role";
}

// 拥有USER角色并且还需要拥有datebase-setting:get权限
@GetMapping("/info")
@PreAuthorize("hasAuthority('datebase-setting:get') and hasRole('USER')")
public Result info(){
}