Spring-Security教程(一) :入门与无状态登录

Java 领域里有两个权鉴框架比较出名 Shiro 和 Spring Security。
其中Shiro是一个简洁易用的开源框架,它的使用简单,功能围绕着用户认证、用户授权、身份管理几个点中,一般中小型业务现在都有用到它。
而Spring Security则是一个Spring官方的权限管理、权限授权的开源框架,它拥有比Shiro更强大的身份控制系统,而且可以在使用无状态认证(Shiro则是使用Session),所以它在大型分布式、微服务项目中更加广泛使用。
官方介绍:
Spring Security 是一个功能强大且高度可定制的身份验证和访问控制框架。它是基于 Spring 的应用程序的上的标准。
Spring Security 是一个专注于为 Java 应用程序提供身份验证和授权的框架。与所有 Spring 项目一样,Spring Security 的真正强大之处在于它可以轻松扩展以满足自定义要求(实际上并不轻松 :happy: )。
SpringSecurity 由于其功能框架众多,导致其配置和学习并理解,它并不是一个容易的事,所以被一些人诟病,从而去使用了简单易用的Shiro。
执行图
Spring Security在进行权限控制操作时,其流程大概如下:
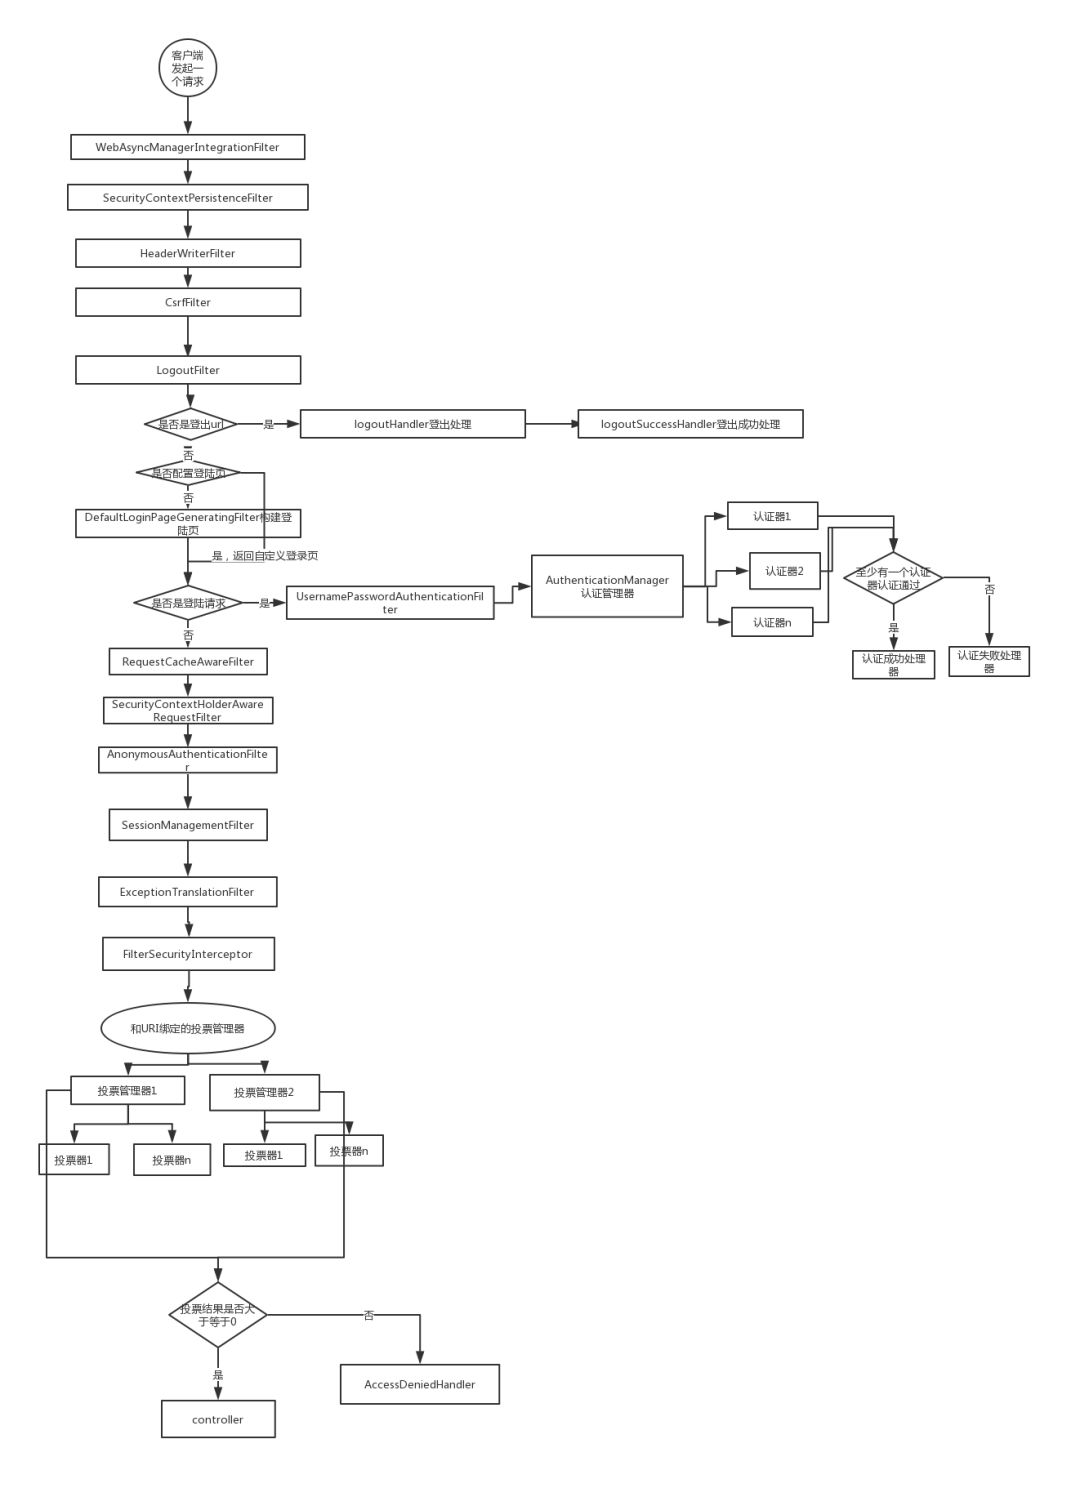
简单文字说明下:
客户端发起一个请求,进入 Security 过滤器链。
当到 LogoutFilter 的时候判断是否是登出路径,如果是登出路径则到 logoutHandler ,如果登出成功则到 logoutSuccessHandler 登出成功处理,如果登出失败则由 ExceptionTranslationFilter ;如果不是登出路径则直接进入下一个过滤器。
当到 UsernamePasswordAuthenticationFilter 的时候判断是否为登录路径,如果是,则进入该过滤器进行登录操作,如果登录失败则到 AuthenticationFailureHandler 登录失败处理器处理,如果登录成功则到 AuthenticationSuccessHandler 登录成功处理器处理,如果不是登录请求则不进入该过滤器。
当到 FilterSecurityInterceptor 的时候会拿到 uri ,根据 uri 去找对应的鉴权管理器,鉴权管理器做鉴权工作,鉴权成功则到 Controller 层否则到 AccessDeniedHandler 鉴权失败处理器处理。
入门教程
在项目中导入SpringSecurity依赖
<dependency>
   <groupId>org.springframework.boot</groupId>
   <artifactId>spring-boot-starter-security</artifactId>
</dependency>
导入依赖后,运行其项目后,会运行项目地址会发现自动跳转到了其login页面下:
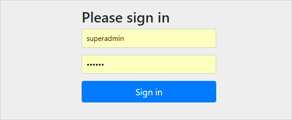
这个页面是SpringSecurity默认的身份认证页面。
spring security 默认的用户名是user,在新版本spring security启动的时候会生成随机密码(在启动日志中可以看到)。
身份登录成功后,那么就会正常的访问项目的其他内容。
我们可以在其application.yaml配置文件中进行修改默认密码:
spring:
  security:
    user:
      name: root
      password: root
配置文件修改
在上述流程图中的所有流程均通过其WebSecurityConfigurerAdapter这个接口来进行,所以需要进行重写该接口来进行配置相关项目的SpringSecurity配置。
@Configuration
public class SecurityConfig extends WebSecurityConfigurerAdapter {
...
}
我们重写一些方法,如下:
@Configuration
public class MySecurityConfiguration extends WebSecurityConfigurerAdapter {
    @Override
    protected void configure(AuthenticationManagerBuilder auth) throws Exception {
        auth
                .inMemoryAuthentication()
                .withUser("admin") // 添加用户admin
                .password("{noop}admin")  // 不设置密码加密
                .roles("ADMIN", "USER")// 添加角色为admin,user
                .and()
                .withUser("user") // 添加用户user
                .password("{noop}user")
                .roles("USER")
                .and()
                .withUser("tmp") // 添加用户tmp
                .password("{noop}tmp")
                .roles(); // 没有角色
    }
    @Override
    protected void configure(HttpSecurity http) throws Exception {
        http
                .authorizeRequests()
                .antMatchers("/product/**").hasRole("USER") //添加/product/** 下的所有请求只能由user角色才能访问
                .antMatchers("/admin/**").hasRole("ADMIN") //添加/admin/** 下的所有请求只能由admin角色才能访问
                .anyRequest().authenticated() // 没有定义的请求,所有的角色都可以访问(tmp也可以)。
                .and()
                .formLogin().and()
                .httpBasic();
    }
}
我们来详细说明下重写的各个常用的方法:
configure(AuthenticationManagerBuilder auth) :身份认证的配置
configure(HttpSecurity http):网页权限配置
读取数据库实现用户登录
当然这样操作自然是不常用的。因为一般用户登录信息都会存入数据库,而不是直接写在配置里面。。。
我们来实现数据库读取用户,修改配置文件:
@Configuration
public class MySecurityConfiguration extends WebSecurityConfigurerAdapter {

    @Autowired
    private UserDetailsService userDetailsService;

    @Override
    protected void configure(AuthenticationManagerBuilder auth) throws Exception {
        auth.userDetailsService(userDetailsService)// 设置自定义的userDetailsService
                .passwordEncoder(passwordEncoder());  //密码的算法
    }

    @Override
    protected void configure(HttpSecurity http) throws Exception {
        http
                .authorizeRequests()
                .antMatchers("/product/**").hasRole("USER")
                .antMatchers("/admin/**").hasRole("ADMIN")
                .anyRequest().authenticated() //
                .and()
                .formLogin()
                .and()
                .httpBasic()
                .and().logout().logoutUrl("/logout");
    }

    @Bean
    public PasswordEncoder passwordEncoder() {
        return NoOpPasswordEncoder.getInstance();// 使用不使用加密算法保持密码
//        return new BCryptPasswordEncoder();
    }
}
其中我们重写 UserDetailsService ,来实现登录验证操作:
@Component("userDetailsService")
public class CustomUserDetailsService implements UserDetailsService {
@Resource
private SimpleUserMapper simpleUserMapper;
@Override
public UserDetails loadUserByUsername(String login) throws UsernameNotFoundException {
Example example = new Example(SimpleUser.class);
example.createCriteria().andEqualTo("userName", login);
// 1. 查询用户
List<SimpleUser> userFromDatabase = simpleUserMapper.selectByExample(example);
if (userFromDatabase.isEmpty()) {
System.out.println("User was not found in db");
throw new UsernameNotFoundException("User " + login + " was not found in db");
//这里找不到必须抛异常
}
// 2. 设置角色
Collection<GrantedAuthority> grantedAuthorities = new ArrayList<>();
GrantedAuthority grantedAuthority = new SimpleGrantedAuthority(userFromDatabase.get(0).getRole());
grantedAuthorities.add(grantedAuthority);
return new User(login, userFromDatabase.get(0).getUserPassword(), grantedAuthorities);
}
}
数据库连接相关配置完后,我们可以启动服务,可以发现当login进行登录时将会执行其UserDetailsService中loadUserByUsername方法,进行查询用户以及其权限,然后再通过passwordEncoder中设置的算法进行验证密码正确性。
获取登录信息
对于已经登录的用户,我们可以使用SecurityContext来获取其信息
@RequestMapping("/info")
public String info(){
    String userDetails = null;
    Object principal = SecurityContext.getContext().getAuthentication().getPrincipal();
    if(principal instanceof UserDetails) {
        userDetails = ((UserDetails)principal).getUsername();
    }else {
        userDetails = principal.toString();
    }
    return userDetails;
}
SecurityContext是安全的上下文,所有的登录的用户信息数据都是保存到SecurityContext中,它主要通过SecurityContextHolder来获取。
SecurityContext context = SecurityContextHolder.getContext();
SecurityContext其中拥有多个用户信息:
Authentication表示当前的认证情况,可以获取的对象有:
UserDetails:获取用户信息,是否锁定等额外信息。
Credentials:获取密码。
isAuthenticated:获取是否已经认证过。
Principal:获取用户,如果没有认证,那么就是用户名,如果认证了,返回UserDetails。
限制登录个数
Spring Security默认使用Session来进行身份认证的。
默认身份认证是无限制数量的,也就是说100个浏览器同时就可以登录100个相同用户,但对于一些项目比如QQ、银行操作,我们需要限制登录,避免安全问题和事务处理问题。
目前限制登录有两个思路:
- 后来的登录认证自动踢掉前面的登录认证。
- 如果用户已经登录,则不允许后来者登录。
踢掉已经登录用户
想要用新的登录踢掉旧的登录,我们只需要将最大会话数设置为 1 即可,配置如下:
@Override
protected void configure(HttpSecurity http) throws Exception {
    http.authorizeRequests()
            ...
            .sessionManagement()
            .maximumSessions(1);
}
maximumSessions 表示配置最大会话数为 1,这样的话,后面的登录就会自动踢掉前面的登录。
禁止新的登录
如果相同的用户已经登录了,你不想踢掉他,而是想禁止新的登录操作的话,配置如下:
@Override
protected void configure(HttpSecurity http) throws Exception {
    http.authorizeRequests()
            ...
            .sessionManagement()
            .maximumSessions(1)
            .maxSessionsPreventsLogin(true);
}
在原有的maximumSessions基础上添加 maxSessionsPreventsLogin 配置即可。此时一个浏览器登录成功后,另外一个浏览器就登录不了了。
但是,这样虽然可以实现禁止新的登录进来,但是你会发现,当前用户退出后,依旧会被禁止登录进去,这是为什么呢?
因为在 Spring Security 中,它是通过监听 session 的销毁事件,来及时的清理 session 的记录。用户从不同的浏览器登录后,都会有对应的 session,当用户注销登录之后,session 就会失效,但是默认的失效是通过调用 StandardSession内的invalidate 方法来实现的,这一个失效事件无法被 Spring 容器监听到,进而导致当用户注销登录之后,Spring Security 没有及时清理会话信息表,以为用户还在线,进而导致用户无法重新登录进来。
说白了就是Spring Security的默认注销登录,Spring Security不会立即将其用户会话删除,从而导致它误以为还在线。
为了解决这个问题,我们需要提供提供一个 Bean:
@Bean
HttpSessionEventPublisher httpSessionEventPublisher() {
    return new HttpSessionEventPublisher();
}
需要重写HttpSessionEventPublisher ,它需要实现HttpSessionListener 接口,在该 Bean 中,可以将 session 创建以及销毁的事件及时感知到,并且调用 Spring 中的事件机制将相关的创建和销毁事件发布出去:
public void sessionCreated(HttpSessionEvent event) {
    HttpSessionCreatedEvent e = new HttpSessionCreatedEvent(event.getSession());
    getContext(event.getSession().getServletContext()).publishEvent(e);
}
public void sessionDestroyed(HttpSessionEvent event) {
    HttpSessionDestroyedEvent e = new HttpSessionDestroyedEvent(event.getSession());
    getContext(event.getSession().getServletContext()).publishEvent(e);
}
前后端分离无状态实现教程
定义无身份认证页面
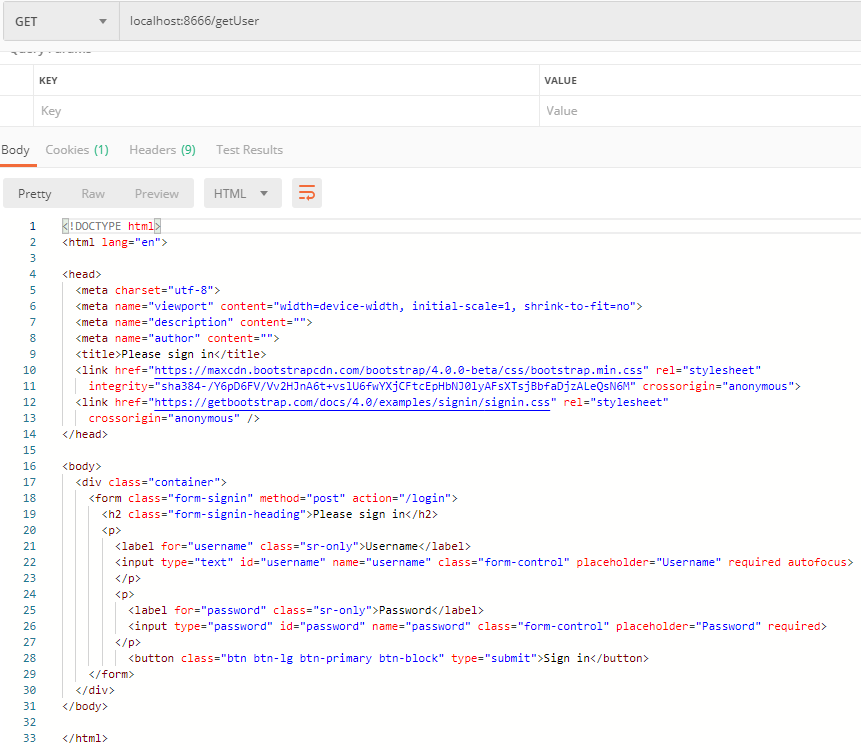
在前后端不分离的时候当用户未登录去访问资源时Spring security会重定向到默认的登录页面,返回的是一串html标签,这一串html标签其实就是登录页面的提交表单。如图所示
虽然在其SpringSecurity配置中可以使用 向configure方法中添加相关页面跳过授权。
http.antMatchers("/**").permitAll()
但是这对于需要授权的页面来说,不能这样做。一般前后端中会返回指定的Result Json数据,所以我们接下来要做的就是屏蔽重定向的登录页面,并返回统一的json格式的返回体。而实现这一功能的核心就是实现AuthenticationEntryPoint.
/**
 * @description: 未进行身份授权处理
 * @author: Zhaotianyi
 * @time: 2021/11/17 15:11
 */
@Component
public class UnAuthenticationEntryPoint implements AuthenticationEntryPoint {
    @Override
    public void commence(HttpServletRequest request, HttpServletResponse response, AuthenticationException authException) throws IOException, ServletException {
        // 输出Result Json数据
        Result result = ResultBuilder.failResult(ResultCode.UNAUTHORIZED, "您未登录,无法访问。");
        response.setCharacterEncoding("UTF-8");
        response.setContentType("application/json");
        response.getWriter().write(JSON.toJSONString(result));
        response.getWriter().flush();
    }
}
并在WebSecurityConfig中注入,然后设置在configure(HttpSecurity http)方法中。
@Autowired
private UnAuthenticationEntryPoint unAuthenticationEntryPoint;
...
http.exceptionHandling()
    .authenticationEntryPoint(unAuthenticationEntryPoint);
定义无权限返回页面
前后端中,我们还需要对其没有相关权限的用户操作返回页面进行定义,实现返回Result Json。
定义自定义无权限返回页面 需要实现AccessDeniedHandler接口,它相当于一个拦截器,拦截没有权限的用户
/**
 * @description: 重写新的权限拒绝访问拦截器
 * @author: Zhaotianyi
 * @time: 2021/11/17 14:24
 */
@Component
public class RewriteAccessDenyFilter implements AccessDeniedHandler {
    @Override
    public void handle(HttpServletRequest request, HttpServletResponse response, AccessDeniedException accessDeniedException) throws IOException, ServletException {
        Result result = ResultBuilder.failResult(ResultCode.NOPERMISSION, "当前用户无权限!");
        response.setContentType("application/json;charset=utf-8");
        response.setCharacterEncoding("UTF-8");
        response.getWriter().write(JSON.toJSONString(result));
        response.getWriter().flush();
    }
}
依旧需要在WebSecurityConfig中注入,然后设置在configure(HttpSecurity http)方法中。
@Autowired
private UnAuthenticationEntryPoint unAuthenticationEntryPoint;
...
//添加自定义未授权和未登录结果返回
http.exceptionHandling()
    .accessDeniedHandler(rewriteAccessDenyFilter)
设置自定义密码认证模式
SpringSecurity自带的登录接口会调用其配置中的configureGlobal(AuthenticationManagerBuilder auth)方法。
@Autowired
public void configureGlobal(AuthenticationManagerBuilder auth) throws Exception {
    // 设置自定义的userDetailsService
    auth.userDetailsService(userDetailsService)
            //设置密文解密方式
            .passwordEncoder(passwordEncoder());
}
它使用其相关UserDetailsService来进行查询用户存在,然后使用passwordEncoder来判断密码正确性。
实现自定义密码认证方式需要重写PasswordEncoder接口。
PasswordEncoder接口主要有2个方法:
String encode(CharSequence rawPassword): 进行明文加密操作
boolean matches(CharSequence rawPassword, String encodedPassword):进行验证操作
其中encode方法需要手动在注册API中调用进行加密,而matches除了手动调用外Spring Security 会在userDetailsService后调用,通过其userDetailsService返回的User中的用户输入的明文密码,和其数据库加密密码进行验证。
Spring Security 4 以上默认使用BCrypt 加密方式,它是一个60位复杂的Hash加密方式,特点是随机,每次生成出来的加密密码都不相同,并且包含特殊字母,这样的密码难以被破解,适合保存重要内容。
在保存API中调用BCryptPasswordEncoder的encode方法进行明文密码BCrypt加密:
BCryptPasswordEncoder passwordEncoder=new BCryptPasswordEncoder();
//加密
String encodedPassword = passwordEncoder.encode(password);
虽然BCrypt加密方式非常安全,但是它加密计算慢而且数据库存储长度需求长,所以对于普通密码我们也可以使用其MD5或者SHA-256配合盐值来进行存储密码。以MD5加密为例:
编写一个salt随机盐生成工具,这里自行百度,网上很多。
编写一个MD5工具:
/**
* @description: MD5工具
* @author: Zhaotianyi
* @time: 2021/11/18 13:39
*/
public class MD5Util {
private static String encodedPasswod = "EencodedPassword";
private static String RandomSaltHash = "RandomSaltHash";
private static char[] hex = {'0', '1', '2', '3', '4', '5', '6', '7', '8', '9', 'A', 'B', 'C', 'D', 'E', 'F'};
/**
* 利用明文生成带有16位随机盐的Md5密文
* @param inputStr 明文
*/
public static Map<String, String> generateMd5With16BitRandomSalt(String inputStr) {
Map<String, String> map = new HashMap<>();
try {
MessageDigest md = MessageDigest.getInstance("MD5");
String salt = SaltUtil.getSalt(16);
//原文加盐
String inputWithSalt = inputStr + salt;
//哈希计算,转换输出 带盐密文
String hashResult = byte2HexStr(md.digest(inputWithSalt.getBytes()));
map.put(encodedPasswod, hashResult);
char[] cs = new char[48];
for (int i = 0; i < 48; i += 3) {
cs[i] = hashResult.charAt(i / 3 * 2);
//输出带盐,存储盐到hash值中;每两个hash字符中间插入一个盐字符
cs[i + 1] = salt.charAt(i / 3);
cs[i + 2] = hashResult.charAt(i / 3 * 2 + 1);
}
hashResult = new String(cs);
// 传入带有盐的密文hash
// 用于登陆验证密码时使用相同的盐
map.put(RandomSaltHash, hashResult);
} catch (NoSuchAlgorithmException e) {
e.printStackTrace();
}
return map;
}
/**
* 检验带盐的hash是否为其明文
*
* @param rawPassword 明文
* @param encodedPasswod 从数据库中查询到的加密密文
* @param Salthash 带盐hash
* @return boolean
*/
public static boolean matchesHashWithSalt(String rawPassword, String encodedPasswod, String Salthash) {
try {
MessageDigest md = MessageDigest.getInstance("MD5");
String queriedHash = Salthash;
String salt = getSaltFromHash(queriedHash);
String inputWithSalt = rawPassword + salt;
String Result = byte2HexStr(md.digest(inputWithSalt.getBytes()));
if (encodedPasswod.equals(Result)) {
return true;
} else {
return false;
}
} catch (NoSuchAlgorithmException e) {
e.printStackTrace();
}
return false;
}
/**
* @return: 十六进制字符串
* @params: [bytes]
* @Descrption: 将字节数组转换成十六进制字符串
*/
private static String byte2HexStr(byte[] bytes) {
/**
*@Author: DavidHuang
*@Time: 19:41 2018/5/10
*@return: java.lang.String
*@params: * @param bytes
*@Descrption:
*/
int len = bytes.length;
StringBuffer result = new StringBuffer();
for (int i = 0; i < len; i++) {
byte byte0 = bytes[i];
result.append(hex[byte0 >>> 4 & 0xf]);
result.append(hex[byte0 & 0xf]);
}
return result.toString();
}
/**
* @return: 提取的salt
* @params: [hash] 3i byte带盐的hash值,带盐方法与MD5WithSalt中相同
* @Descrption: 从库中查找到的hash值提取出的salt
*/
public static String getSaltFromHash(String hash) {
StringBuilder sb = new StringBuilder();
char[] h = hash.toCharArray();
for (int i = 0; i < hash.length(); i += 3) {
sb.append(h[i + 1]);
}
return sb.toString();
}
}
这个工具,上面主要提供了2个方法:
generateMd5With16BitRandomSalt(String inputStr):根据其明文生成密文,带有随机盐机密,返回一个Map,分别为加密密文和SaltHash
matchesHashWithSalt(String rawPassword, String encodedPasswod, String Salthash):用作验证,传入用户输入明文、数据库获取的密文、数据库获取的SaltHash
我们使用generateMd5With16BitRandomSalt生成密文和随机盐值Hash,然后分别存储在数据库中,然后登录时使用matchesHashWithSalt方法用 用户输入的密文来和数据库中的密文、随机盐值Hash进行验证正确性。
这里可能有人问了,为什么不存储Salt呢?因为将其Salt明文存储进数据库不安全,在后续不进行反复散列计算情况下,照样会被轻松破解。
随后创建一个MD5PasswordEncoder来实现PasswordEncoder接口功能即可。这里主要是matches验证方法:
@Override
public boolean matches(CharSequence charSequence, String s) {
    // 分割传来的密文,其中前者为加密密文,后者为带盐hash
    String[] strings = s.split("\\|");
    String encodedPassword = strings[0];
    String saltHash = strings[1];
    // 判断是否密文与加密密文是否相同
    return MD5Util.matchesHashWithSalt(charSequence.toString(), encodedPassword, saltHash);
}
可以将其 数据库中密文和saltHash进行连接,用‘|’来分割。
在UserDetailsService传出的User中的第二个参数password 传入:
   @Override
    public UserDetails loadUserByUsername(String login) throws UsernameNotFoundException {
        ...
        String encodedPassword = userFromDatabase.get(0).getUserPassword();
        String saltHash = userFromDatabase.get(0).getSalt();
        String allEncoded = encodedPassword + "|" + saltHash;
        return new User(login, allEncoded, grantedAuthorities);
    }
到此,自定义密码认证就起作用了。
使用Token无状态认证
spring security会在默认的情况下将认证信息放到HttpSession中。
但是对于我们的前后端分离的情况,如app,小程序,web前后分离等,httpSession就没有用武之地了。这时我们可以通过configure(httpSecurity)设置spring security是否使用httpSession。
首先我们需要修改spring security配置:
@Override
    protected void configure(HttpSecurity http) throws Exception {
        http
                .sessionManagement()
                //设置无状态,所有的值如下所示。
                .sessionCreationPolicy(SessionCreationPolicy.STATELESS)
                // code...
    }
共有四种值,其中默认的是ifRequired。
- always – a session will always be created if one doesn’t already exist,没有session就创建。
- ifRequired – a session will be created only if required (default),如果需要就创建(默认)。
- never – the framework will never create a session itself but it will use one if it already exists
- stateless – no session will be created or used by Spring Security 不创建不使用session
由于前后端不通过保存session和cookie来进行判断,所以为了保证spring security能够记录登录状态,所以需要传递一个值,让这个值能够自我验证来源,同时能够得到数据信息。选型我们选择JWT。对于java客户端我们选择使用jjwt。
在开始前,务必需要了解下JWT和它的使用。
对此添加JJWT依赖:
<dependency>
    <groupId>io.jsonwebtoken</groupId>
    <artifactId>jjwt-api</artifactId>
    <version>0.11.2</version>
</dependency>
<dependency>
    <groupId>io.jsonwebtoken</groupId>
    <artifactId>jjwt-impl</artifactId>
    <version>0.11.2</version>
    <scope>runtime</scope>
</dependency>
<dependency>
    <groupId>io.jsonwebtoken</groupId>
    <artifactId>jjwt-jackson</artifactId> <!-- or jjwt-gson if Gson is preferred -->
    <version>0.11.2</version>
    <scope>runtime</scope>
</dependency>
创建JJWT配置
在创建JWT的工具前,需要创建一个配置JJWT的组件,设置它到项目配置中,以便更好的进行修改相关配置。
/**
 * @description: JJWT配置
 * @author: Zhaotianyi
 * @time: 2021/11/17 11:29
 */
@Component
@ConfigurationProperties(prefix = "jjwt.security")
public class JJWTProperties {
    // JWT加密密码
    private String secret;
    // base64加密密码 (与其上面二选一)
    private String base64Secret;
    // token过期时间
    private long tokenValidityInSeconds;
    // token出于记住时过期时间
    private long tokenValidityInSecondsForRememberMe;

    public String getSecret() {
        return secret;
    }

    public void setSecret(String secret) {
        this.secret = secret;
    }

    public String getBase64Secret() {
        return base64Secret;
    }

    public void setBase64Secret(String base64Secret) {
        this.base64Secret = base64Secret;
    }

    public long getTokenValidityInSeconds() {
        return tokenValidityInSeconds;
    }

    public void setTokenValidityInSeconds(long tokenValidityInSeconds) {
        this.tokenValidityInSeconds = tokenValidityInSeconds;
    }

    public long getTokenValidityInSecondsForRememberMe() {
        return tokenValidityInSecondsForRememberMe;
    }

    public void setTokenValidityInSecondsForRememberMe(long tokenValidityInSecondsForRememberMe) {
        this.tokenValidityInSecondsForRememberMe = tokenValidityInSecondsForRememberMe;
    }
}
上面的配置根据设计项目需求来定,但一般这些足够了。
随后我们便可以去项目配置文件中配置相关属性:
jjwt:
  security:
    base64-secret: MDk5ZmU2YzdhZWE5NWRhZTU0MjgzMTVmMTkxYTI5ZGJmODc3NWU2ZDc5OWI1YWMxZTE5NWYxZWVhY2VmZGYwMWQ1NmExNjI4M2M2OWUzOGM0Nzg1ZGU2YzgxNWVjYzNhODg4YzE0ODhlZDA0YjZlYTgzYzk3MGE4NWFkMmJmOGI=
    token-validity-in-seconds: 60
    token-validity-in-seconds-for-remember-me: 2592000
创建JWTProvider来创建、验证Token
package com.example.springsecurity.component;
import com.example.springsecurity.mapper.SimpleUserMapper;
import com.example.springsecurity.model.SimpleUser;
import io.jsonwebtoken.*;
import io.jsonwebtoken.io.Decoders;
import io.jsonwebtoken.security.Keys;
import org.springframework.beans.factory.annotation.Autowired;
import org.springframework.security.authentication.UsernamePasswordAuthenticationToken;
import org.springframework.security.core.Authentication;
import org.springframework.security.core.GrantedAuthority;
import org.springframework.security.core.userdetails.UserDetails;
import org.springframework.stereotype.Component;
import org.springframework.util.StringUtils;
import tk.mybatis.mapper.entity.Example;
import javax.annotation.PostConstruct;
import java.nio.charset.StandardCharsets;
import java.security.Key;
import java.util.*;
/**
* @description: JWT认证工具类
* @author: Zhaotianyi
* @time: 2021/11/17 11:22
*/
@Component
public class JWTProvider {
private Key key; // 私钥
private long tokenValidityInMilliseconds; // 有效时间
private long tokenValidityInMillisecondsForRememberMe; // 记住我有效时间
// 用户操作类(用于数据库查询操作)
@Autowired
private SimpleUserMapper simpleUserMapper;
@Autowired
private JJWTProperties jjwtProperties; // JJWT配置参数
/**
* 初始化
*/
@PostConstruct
public void init() {
byte[] keyBytes;
String secret = jjwtProperties.getSecret();
if (StringUtils.hasText(secret)) {
System.out.println("Warning: the JWT key used is not Base64-encoded. " +
"We recommend using the `jhipster.security.authentication.jwt.base64-secret` key for optimum security.");
keyBytes = secret.getBytes(StandardCharsets.UTF_8);
} else {
System.out.println("Using a Base64-encoded JWT secret key");
keyBytes = Decoders.BASE64.decode(jjwtProperties.getBase64Secret());
}
this.key = Keys.hmacShaKeyFor(keyBytes); // 使用mac-sha算法的密钥
this.tokenValidityInMilliseconds =
1000 * jjwtProperties.getTokenValidityInSeconds();
this.tokenValidityInMillisecondsForRememberMe =
1000 * jjwtProperties.getTokenValidityInSecondsForRememberMe();
}
/**
* 根据用户信息创建Token
* @param userDetails 用户信息
* @param rememberMe 是否记住
* @return Token
*/
public String createToken(UserDetails userDetails, boolean rememberMe) {
long now = (new Date()).getTime();
Date validity;
if (rememberMe) {
validity = new Date(now + this.tokenValidityInMillisecondsForRememberMe);
} else {
validity = new Date(now + this.tokenValidityInMilliseconds);
}
Map<String ,Object> map = new HashMap<>();
map.put("sub",userDetails.getUsername());
return Jwts.builder()
.setClaims(map) // 添加body
.signWith(key, SignatureAlgorithm.HS512) // 指定摘要算法
.setExpiration(validity) // 设置有效时间
.compact();
}
/**
* 根据身份认证创建Token
* @param authentication 身份认证类
* @param rememberMe 是否记住
* @return Token
*/
public String createToken(Authentication authentication, boolean rememberMe) {
long now = (new Date()).getTime();
Date validity;
if (rememberMe) {
validity = new Date(now + this.tokenValidityInMillisecondsForRememberMe);
} else {
validity = new Date(now + this.tokenValidityInMilliseconds);
}
Example example = new Example(SimpleUser.class);
example.createCriteria().andEqualTo("userName",authentication.getName());
List<SimpleUser> list = simpleUserMapper.selectByExample(example);
Map<String ,Object> map = new HashMap<>();
map.put("sub",authentication.getName());
map.put("user",list.get(0));
return Jwts.builder()
.setClaims(map) // 添加body
.signWith(key, SignatureAlgorithm.HS512) // 指定摘要算法
.setExpiration(validity) // 设置有效时间
.compact();
}
/**
* 根据Token获取身份认证
* @param token Token
* @return 身份认证类
* @throws ExpiredJwtException Token超时
* @throws MalformedJwtException Token错误
*/
public Authentication getAuthentication(String token) throws ExpiredJwtException,MalformedJwtException{
Claims claims = Jwts.parserBuilder()
.setSigningKey(key)
.build()
.parseClaimsJws(token).getBody(); // 根据token获取body
SimpleUser principal;
Collection<? extends GrantedAuthority> authorities;
Example example = new Example(SimpleUser.class);
example.createCriteria().andEqualTo("userName",claims.getSubject());
principal = simpleUserMapper.selectByExample(example).get(0);
authorities = principal.getAuthorities();
return new UsernamePasswordAuthenticationToken(principal, token, authorities);
}
}
上述为JWT的操作工具类,使用它来创建身份Token、解析身份Token。
其中的自动注入的SimpleUserMapper为数据库的操作服务类,具体是Service层还是DAO层根据其项目设计来定。
实现登录成功返回Token
一般情况下我们可以直接使用SpringSecurity自带的登录接口,当然如果不满足需求,比如需要添加随机验证码认证等,也可以自己设置登录接口。这儿单讲述下前者。
使用SpringSecurity自带的登录接口Api,前后端登录情况下,登录成后需要返回对于用户Token,所以得自行定义其登录成功拦截器,AuthenticationSuccessHandler,然后配置到其配置中。
.formLogin().loginProcessingUrl("/login").
            successHandler((request, response, authentication) -> {
           PrintWriter writer = response.getWriter();
           writer.println(jwtProvider.createToken(authentication, true));
})
loginProcessingUrl可以自行配置其自带的登录接口处理地址。
上述是使用一个匿名函数通过JWT工具来对成功的用户认证类进行处理,实现简单的返回Token功能。当然实际情况还是需要返回一个规范的Result给前端。
接口无状态认证
前面都是讲述如何在登录时Token操作。无状态的算法认证就是需要在其请求上head加入对应字段放置token,然后根据token来进行身份认证,达到不需要外置session认证等帮助。
为此我们需要实现一个JWTFilter过滤器 来进行对需要认证的页面进行过滤拦截操作,检查head是否带有对应token字段等操作:
/**
 * @description: JWT过滤器
 * 用于jwt获取authentication,来传输给SpringSecurity,通过认证
 * @author: Zhaotianyi
 * @time: 2021/11/17 11:48
 */
public class JWTFilter extends GenericFilterBean {
    private final static String HEADER_AUTH_NAME = "auth";

    private final JWTProvider jwtProvider;

    public JWTFilter(JWTProvider jwtProvider) {
        this.jwtProvider = jwtProvider;
    }

    @Override
    public void doFilter(ServletRequest servletRequest, ServletResponse servletResponse, FilterChain filterChain) throws IOException, ServletException, ServiceException {
        HttpServletRequest httpServletRequest = (HttpServletRequest) servletRequest;
        String authToken = httpServletRequest.getHeader(HEADER_AUTH_NAME);
        if (StringUtils.hasText(authToken)) {
            // 从自定义JWT中中解析用户
            Authentication authentication = null;
            // 解析头部auth TOKEN,过期拦截
            try {
                authentication = this.jwtProvider.getAuthentication(authToken);
            } catch (ExpiredJwtException e) {
                Result result = ResultBuilder.failResult("登录身份过期,请重新登录!");
                servletResponse.setContentType("application/json;charset=utf-8");
                servletResponse.setCharacterEncoding("UTF-8");
                servletResponse.getWriter().write(JSON.toJSONString(result));
                return;
            }catch (MalformedJwtException e){
                Result result = ResultBuilder.failResult("身份错误,请重新登录!");
                servletResponse.setContentType("application/json;charset=utf-8");
                servletResponse.setCharacterEncoding("UTF-8");
                servletResponse.getWriter().write(JSON.toJSONString(result));
                return;
            }
            // 将其解析来的Authentication存入SecurityContext中
            SecurityContextHolder.getContext().setAuthentication(authentication);
        }
        // 调用后续的Filter,如果上面的代码逻辑未能复原“session”,SecurityContext中没有信息,后面的流程还是需要"需要登录"
        filterChain.doFilter(servletRequest, servletResponse);
    }
}
上述JWTFilter过滤器,定义其head中是否存在auth 的字段,存在的话在进行将其内容使用JWTProvider来认证。
对于Token过期时间到期、Token错误等错误进行拦截处理并返回显示。
然后需要在其Spring Security中进行提前添加该过滤器。
@Override
protected void configure(HttpSecurity http) throws Exception {
    ...
    // 登录添加过滤器,先提前主要获取头部JWTToken来通过SpringSecurity
    http.
         // 头部没有JWT Token则继续执行UsernamePasswordAuthenticationFilter过滤器。
          .addFilterBefore(new JWTFilter(jwtProvider),UsernamePasswordAuthenticationFilter.class)
         ...
}
踢人下线操作
常常见到一些项目要求一个用户只能一端登录,当用户被第二次登录后,前一个登录状态就会被关闭,比如QQ、网络游戏等。这一种操作又叫踢人下线操作,这种操作不仅可以在登录使用,还可以用在管理员强制让用户下线等场景上。踢人下线这种单端模式,除了满足设计外,还能避免事务处理的同步性问题,使项目设计事务处理变得简单。
无状态的JWT认证下,是没有缓存存储、去中心化的设计方法。但它只靠它不能做到踢人下线操作。通常我们还需要一个缓存服务器比如Redis来实现记录在线功能。
设计思路:登录时,利用Redis存储其JWT,key设置为登录名或者ID等唯一标签。
使用JWT认证时,在Redis查询其唯一标签,得到的JWT与其使用的JWT进行对比,若不一致则代表用户被其他登录下线。
Redis的配置以及使用这儿省略。
在JWT认证工具类JWTProvider 中进行Redis读写操作:
/**
* @description: JWT认证工具类
* @author: Zhaotianyi
* @time: 2021/11/17 11:22
*/
@Component
public class JWTProvider {
/**
* 根据用户信息创建Token
*
* @param userDetails 用户信息
* @param rememberMe 是否记住
* @return Token
*/
public String createToken(UserDetails userDetails, boolean rememberMe) {
...
Map<String, Object> map = new HashMap<>(16);
map.put("sub", userDetails.getUsername());
String token = Jwts.builder()
// 添加body
.setClaims(map)
// 指定摘要算法
.signWith(key, SignatureAlgorithm.HS512)
// 设置有效时间
.setExpiration(validity)
.compact();
// 将其存入Redis中持久化
redisUtils.set(userDetails.getUsername(), token, jjwtProperties.getTokenValidityInSeconds());
return token;
}
/**
* 根据Token获取身份认证
*
* @param token Token串
* @return 身份认证类
* @throws ExpiredJwtException Token超时
* @throws MalformedJwtException Token错误
*/
public Authentication getAuthentication(String token) throws ExpiredJwtException, MalformedJwtException {
// 根据token获取body
Claims claims;
claims = Jwts.parserBuilder()
.setSigningKey(key)
.build()
.parseClaimsJws(token).getBody();
String jwt = (String) redisUtils.get(claims.getSubject());
// 如果其Redis中的jwt 与其header中的jwt不一致,代表其账号被二次登录,强制下线
if (!token.equals(jwt)) {
throw new MalformedJwtException("该账号被二次登录,请重新登录!");
}
...
}
}