Vue基础
Vue (读音 /vjuː/,类似于 view) 是一套用于构建用户界面的渐进式框架。
与其它大型框架不同的是,Vue 被设计为可以自底向上逐层应用。
Vue 的核心库只关注视图层,不仅易于上手,还便于与第三方库或既有项目整合。
另一方面,当与现代化的工具链以及各种支持类库结合使用时,Vue 也完全能够为复杂的单页应用提供驱动。
环境配置
一.下载Node.js
官方地址:https://nodejs.org/en/download/
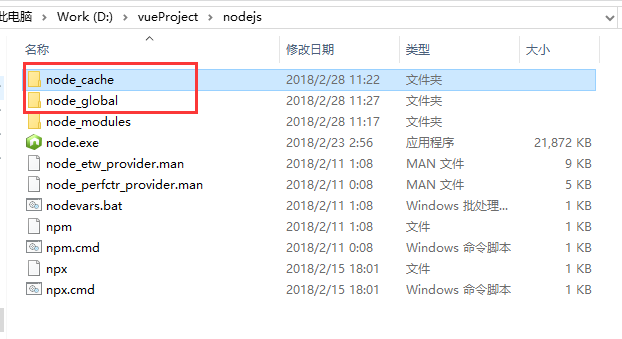
二.设置nodejs prefix(全局)和cache(缓存)路径
在Node.js目录下新建node_global和node_cache两个文件夹
三.设置缓存文件夹
npm config set cache "D:\vueProject\nodejs\node_cache"
四.设置全局模块存放路径
npm config set prefix "D:\vueProject\nodejs\node_global"
五.设置环境变量
将其Node.js目录下node_global文件夹添加至Path中。
新增系统变量NODE_PATH,路径为Node.js目录下node_modules文件夹。
基于 Node.js 安装cnpm(淘宝镜像)
npm install -g cnpm --registry=https://registry.npm.taobao.org
六.安装Vue
cnpm install vue -g
七.安装vue命令行工具,即vue-cli 脚手架
cnpm install vue-cli -g
利用vue-cli脚手架搭建新项目
在CMD定位至项目目录下输入
vue init webpack-simple 项目名称(使用英文)
其中项目名称中不能使用大写.
CMD定位到工程目录下,安装该工程依赖的模块,这些模块将被安装在:项目名称\node_module目录下,node_module文件夹会被新建,而且根据package.json的配置下载该项目的modules
cnpm install
八.运行Vue项目
cnpm run dev / npm run dev
九.Vue打包上线
npm run build
打包完成后,会生成 dist 文件夹,如果已经修改了文件路径,可以直接打开本地文件查看。
项目上线时,只需要将 dist 文件夹放到服务器就行了。
vue.js基础
属性绑定:
v-bind:xxx=”aaa” / v-bind:title=”message3”
将aaa内容绑定到XXX属性上
事件监听器:
v-on:xxx=”aaa” / v-on:click=”sayHi”
XXX属性进行监听,返回aaa内容
双向绑定:
v-model=”XXX” / v-model=”message”
将XXX进行view,model双向绑定到上,修改一处会同时变化
<div id="main">
{{message}}
{{message2}}
<!-- 将message3内容绑定到title属性中 -->
<span v-bind:title="message3">
鼠标悬停几秒钟查看此处动态绑定的提示信息!
</span>
<!--foreach循环-->
<li v-for="(item,index) in items">
{{item.ms}}---{{index}}
</li>
<button v-on:click="sayHi">Click Me</button>
<!--model双向绑定-->
<input type="text" v-model="message">
<p></p>
<input type="radio" name="sex" value="男" v-model="sex" checked>男
<input type="radio" name="sex" value="女" v-model="sex">女
<p>选择了: {{sex}}</p>
</div>
<!--导入vue.js-->
<script src="https://cdn.jsdelivr.net/npm/vue@2.5.21/dist/vue.min.js"></script>
<script>
var vm=new Vue({
el:"#main",
data:{
message : "Hello,Vue!",
message2 : "Hello,World!",
message3 : "Hello,World!!!",
items : [
{ms : "ms1"},
{ms : "ms2"},
{ms : "ms3"}
],
sex : ""
},
// 方法必须定义在Vue的methods中
methods:{
sayHi:function(){
alert(this.message);
}
}
});
</script>
Vue组件
组件是可复用的Vue实例,就是一组可以自定义使用的模板,跟JSTL的自定义标签、Thymeleaf的th:fragment相似。
// 定义一个Vue组件 名为 'demo'
Vue.component("demo",{
template : '<li>Hello,World</li>'
});
var vm= new Vue({
el : "#main"
});
<div id="main">
    <demo></demo>
</div>
Vue组件不能直接访问data层数据,需要绑定到template中的propos属性中。组件中可以带属性。
<!--view层-->
<div id="main">
<!--template不能直接访问data层数据,需要绑定到template中的propos属性中-->
<demo v-for="item in items" v-bind:item1="item"></demo>
</div>
<script src="https://cdn.jsdelivr.net/npm/vue@2.5.21/dist/vue.min.js"></script>
<script>
// 定义一个Vue组件 名为 'demo' 内含一个'item1'的属性
Vue.component("demo",{
props : ['item1'],
template : '<li>{{item1}}</li>'
});
var vm= new Vue({
el : "#main",
data : {
items : ["Vue.js!","JavaScript","JQuery"]
}
});
</script>
Slot插槽
slot:可重复定义的组件
<div id="main">
<todo>
<utitle slot="title-slot" :title="mytitle"></utitle>
<items slot="items-slot" v-for="item in myitems" :item="item"></items>
</todo>
</div>
<!--导入vue.js-->
<script src="https://cdn.jsdelivr.net/npm/vue@2.5.21/dist/vue.min.js"></script>
<script>
Vue.component("todo",{
template: '<div>\
<slot name="title-slot"></slot>\
<ul>\
<slot name="items-slot"></slot>\
</ul>\
</div>'
});
Vue.component("utitle",{
props:['title'],
template: '<div>{{title}}</div>'
});
Vue.component("items",{
props:['item'],
template: '<li>{{item}}</li>'
});
var vm=new Vue({
el: "#main",
data:{
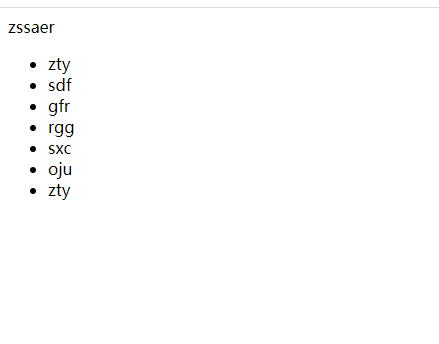
mytitle: 'zssaer',
myitems: ["zty","sdf","gfr","rgg","sxc","oju","zty"]
}
});
</script>
在component中的template下
name为该插槽的名称,当一个组件存在多个slot时,使用name的值来区分.
在view中使用complete充当插槽时,定义slot=”slot-name”.
注意:在 2.6.0 中,我们为具名插槽和作用域插槽引入了一个新的统一的语法 (即 v-slot 指令)。它取代了 slot 和 slot-scope 这两个目前已被废弃但未被移除且仍在文档中的 attribute。
自定义事件
$emit( 自定义事件名, 参数 ):
$emit 绑定一个自定义事件event,当这个这个语句被执行到的时候,就会将参数arg传递给父组件,父组件通过@事件(v-on:事件) 进行监听并接收参数。
<div id="main">
<todo>
<utitle slot="title-slot" :title="mytitle"></utitle>
<items slot="items-slot" v-for="(item,index) in myitems" :item="item" :index="index" @remove="removeItems(index)"></items>
</todo>
</div>
<!--导入vue.js-->
<script src="https://cdn.jsdelivr.net/npm/vue@2.5.21/dist/vue.min.js"></script>
<script>
Vue.component("todo",{
template: '<div>\
<slot name="title-slot"></slot>\
<ul>\
<slot name="items-slot"></slot>\
</ul>\
</div>'
});
Vue.component("utitle",{
props:['title'],
template: '<div>{{title}}</div>'
});
Vue.component("items",{
props:['item','index'],
template: '<li>{{index}}---{{item}} <button @click="remove">Delete</button></li>',
methods:{
remove: function () {
this.$emit('remove',this.index)
}
}
});
var vm=new Vue({
el: "#main",
data:{
mytitle: 'zssaer',
myitems: ["zty","sdf","gfr","rgg","sxc","oju","zty"]
},
methods:{
removeItems:function (index) {
console.log("删除了"+this.myitems[index]+"元素");
this.myitems.splice(index,1); //一次删除一个元素
}
}
});
WebPack打包
WebPack可以将其项目modules中的js文件全部打包为一个js文件.减少项目导入的资源量.
1.使用npm,安装webpack以及webpack-cli
npm install webpack -g
npm install webpack-cli -g
2.在modules文件夹定义一个hello.js文件
//暴露其方法,使其可以被外部调用. 相当于JAVA中的public修饰符
exports.sayHi = function () {
document.write("<h1>Hi!</h1>");
}
3.在modules文件夹定义入口文件main.js文件
var hello = require("./hello");  //使用require方法调用其它module文件,并将其赋值给hello.相当于JAVA中的new
hello.sayHi();  //使用其中的方法
2.在项目主目录下创建webpack.config.js文件
module.exports = {
    entry: './modules/main.js',  //定义其js入口文件
    // mode: 'development',
    output: {
        filename: "./js/bundle.js"  //输出位置,其外自动为dist文件夹
    }
};
3.使用webpack在项目主目录下打包
webpack